Character Study
Character Study. Dan’s MEGA65 Digest for May 2025.
It’s upgrade season in the MEGA65 community! We partied hearty for the 10th anniversary last month, and the result is an all-new stable release of the MEGA65 platform packed with features and bug fixes, a bug fix update to the C64 core, and a new version of the M65Connect app. We also finished up the Screenful of BASIC compo, with 26 entries!
For this month’s feature article, I’m starting my series on MEGA65 character graphics. It’s a big subject that we’ll cover over multiple issues. We’ll probably take breaks to cover other subjects just to mix things up.
Here we go!
MEGA65 platform v0.97 released!
It’s here! Over 14 months in the making, the new MEGA65 platform release v0.97 is now available. The MEGA65 team recommends that all owners upgrade to this version.
Sign in to Filehost with your registered owner account, then download the release package appropriate for your mainboard version:
Upgrade instructions are in the latest User Guide. Remember to copy the SD card files to your SD card, including the .M65 system software files and the MEGA65.ROM file.
Also remember to install the core in slot 1, then also in slot 0. Upgrading slot 0 is easy if you previously upgraded slot 0 to v0.96: press Mega + , (comma) from the core selection menu to start the process. If you have an older core in slot 0, you’ll need to start v0.97 from slot 1 then immediately press and hold No Scroll to re-open the newer version of the core selection menu, then press Mega + , and proceed.
We reviewed the changelogs back in the March Digest. Check out all the new stuff you’re getting.
C64 Core v5.2 released!

Various C64 cartridges tested with the C64 core.
While you’re updating cores, be sure to pick up C64 core v5.2. This maintenance release fixes several bugs, including the HDMI display bug that has blocked a minority of users with a set of vertical bars. It also adds support for COMAL 80, Simons BASIC, Waterloo Structured BASIC, Mikro Assembler, and BMP-Data Turbo 2000 as CRT files.
Huge thanks to everyone testing and contributing fixes to the C64 core!
M65Connect v2.4 released!
M65Connect, the essential desktop companion app for the MEGA65, has an update also! Version 2.4 includes richer support for subdirectories, creating new D81 disk images, and many usability improvements. Whether you connect to your MEGA65 via Ethernet or JTAG adapter, or just move a microSD card between your MEGA65 and your PC, M65Connect is the easiest way to manage your files and perform other tasks.
Starting with M65Connect v2.4, macOS no longer complains that the app is “corrupt,” thanks to a long-awaited bug fix in a library that the app uses. As with many open source apps, the macOS version is “unsigned,” and the first time you run it will be blocked by the operating system. In macOS Sequoia, open the app, dismiss the message with the “Done” button, then open the Privacy & Security panel in macOS settings and scroll down to find the button to give it permission to run (“Open Anyway”).
Thanks as always to Tayger for this great tool.
Screenful of BASIC Compo 2025 results!
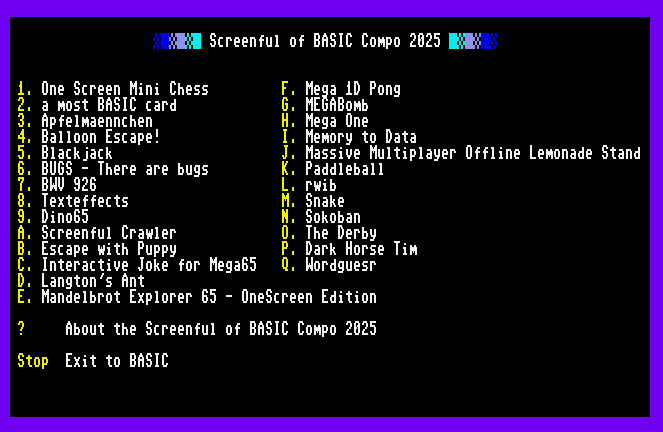
The Screenful of BASIC Compo 2025 compilation disk menu.
From February to April, the Screenful of BASIC Compo 2025 challenged us to write a game, demo, or tool using just an 80x25 screenful of BASIC 65 code. There were 26 fabulous entries.
I put together a compilation disk with all of the entries and a browsable menu. Try them all!
After a friendly round of voting, three winners came out on top:
- Sokoban by johan
- Escape with Puppy by lochmana
- Dark Horse Tim by fredrikr
Want to know more about compact BASIC coding techniques? Check out The 8 Bit Theory’s YouTube video explaining his Screenful Compo entry, “Screenful Crawler,” a 3D maze in just 16 lines.
Several entries have already had updates and expanded versions published to Filehost, so be sure to check those out as well.
Featured Files
More amazing things recently uploaded to Filehost:
- Two arcade cores from muse this month! Rush’n Attack (1985) from Konami, and Moon Patrol (1982) from Irem / Williams Electronics.
- MEGAVOXL and MEGAVOX2, two brilliant 3D voxel demos by Mirage.
- Tank Versus UFO by Zhedlas, a faithful port of the BASIC game from the VIC-20 user manual.
- FTL by SirGeldi, a brief starfield demo with music, in BASIC.
Don’t forget that you can follow the MEGA65Files bot on Mastodon or your favorite federated social media service. The bot posts about both new files and updates to existing ones. If you don’t have a fediverse account, you can also follow the bot’s page in your RSS reader.
Why character graphics?
When you first switch on your MEGA65, it shows a screen with a displayable area 640 pixels wide and 200 pixels tall, capable of displaying up to 4,096 possible colors. The MEGA65’s VIC-IV video chip determines the color of each pixel by reading graphics data from memory, and generates a video signal that draws the final image to the screen, many times per second.
If we were designing a graphics system, how would we design the data that describes the image drawn to the screen? One possibility would be to store the color of each pixel. This screen is 640 x 200 = 128,000 pixels. With 4,096 possible colors, each pixel needs to be stored as 12 bits. 128,000 x 12 = 1,536,000 bits = 192,000 bytes, or 187.5 kilobytes. That’s a lot of memory to dedicate to graphics data. Even if we could find a place to put it in the MEGA65’s RAM, it would require substantial computational power to update this memory to draw or animate objects, or scroll a playfield.
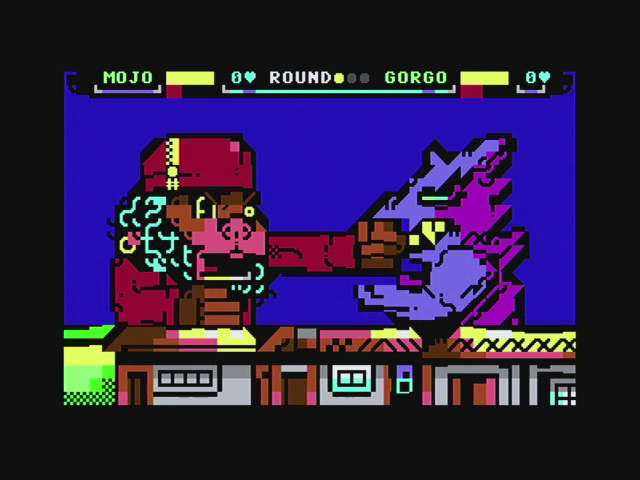
The most obvious way to reduce the memory demand of the graphics system is to reduce the quality of the image. Using a pixel resolution that’s 320 pixels wide instead of 640 cuts the needed memory by half. Reducing the number of possible colors to 256 (a bit depth of 8) cuts it by a third. Naturally, these changes diminish the amount of graphics information we can display. Instead of 80 columns of text, we can only display 40 columns. A program that displays a photograph has to settle for less detail or less color accuracy. Space aliens are chonkier.
There are other ways a graphics system can reduce its capabilities without making such obvious sacrifices in image quality—and this is where things get interesting. Many computer applications do not need the ability to set every pixel on the screen to any possible color at any time. By limiting the system’s capabilities to just what common applications need, a graphics system can use less memory to describe the full display, and still produce high quality images.
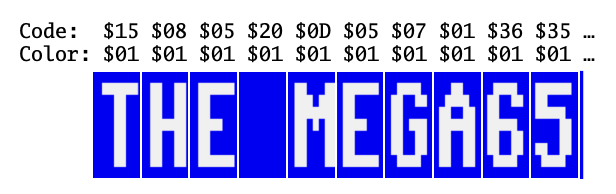
Character graphics are one such scheme. You probably already have a sense of how this works from typing letters, numbers, and symbols at the READY. prompt. In the default text mode, each of these symbols — let’s call them characters — is a small image, 8 pixels wide and 8 pixels tall. On our 640 x 200 pixel screen, 80 of these characters fit on a row, and 25 rows fill the screen. The graphics system knows what each character looks like from a character set stored in memory, containing the images for each of 256 possible characters, including a blank character to represent empty space. By assigning each character a screen code from 0 to 255, we can describe the entire screen in just 80 x 25 = 2,000 bytes of memory.

This scheme uses a monochromatic character set: each character cell is assigned a single foreground color, and the image in the character set describes which pixels should be set to this color. The graphics system uses another 2,000 bytes to describe attributes of each character cell, including five bits to set the foreground color. Each cell can use a different foreground color for its foreground pixels. All other pixels share a common background color for the entire screen, set in a VIC register.
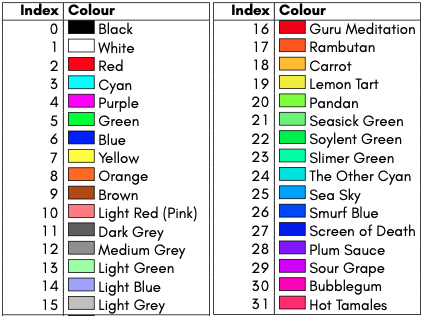
Of course, five color bits can only represent up to 32 colors, not 4,096. Just as the graphics system uses a character set of 256 character patterns, it also uses a palette of 32 colors. Each palette entry is assigned a 12-bit color setting. The MEGA65 starts with a system character set of PETSCII symbols and a system palette of 32 pre-defined colors.
This character graphics scheme uses very little memory compared to the 12-bit pixel scheme, and allows for much faster updates. In exchange, it trades away flexibility in what images can be represented. The entire screen must consist of repeated patterns of 8 pixel x 8 pixel characters selected from a set of 256, only a single foreground color can be used for each character, and colors must be selected from a set of 32.
This trade-off is obviously worth it for text applications, such as the BASIC screen editor, a word processor, or a BBS terminal program. Less obvious, at least at first, is that character graphics are also useful for graphical displays for some games. The default PETSCII character set includes glyphs that can serve as game graphics on their own, such as the heart, diamond, spade, and club for playing card suits. Some symbols are designed to be combined with others in adjacent cells to draw larger objects. Commodore programmers and artists have been exploiting the default character graphics mode for decades, with spectacular results.
Screen memory
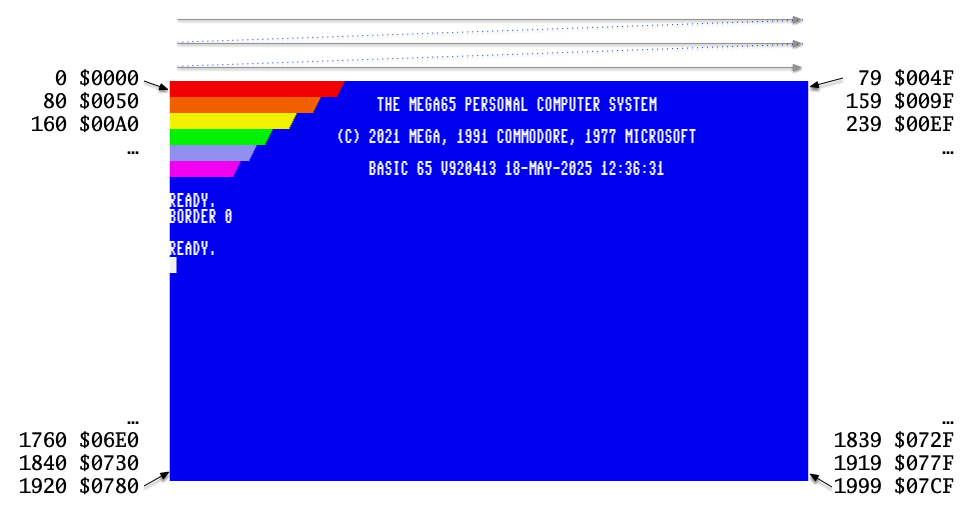
Both screen memory and color memory organize characters by row, starting in the top-left corner and going down the screen. For the default 80 x 25 text mode, each row is 80 bytes, so the first row left-to-right is represented by screen codes in positions 0 to 79, the second row is positions 80 to 159, and so on.
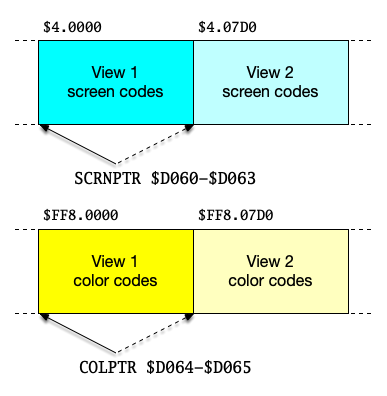
You can tell the VIC-IV chip to use any address within the first 384 KB of memory as the start address of screen memory. This is a special feature! The Commodore 64’s VIC-II, in contrast, has restrictions on which memory can be used as screen memory. With the VIC-IV, the starting address for screen memory is stored as a 28-bit address, in a register called SCRNPTR at addresses $D060 to $D063.
Here is a simple BASIC program that reads the SCRNPTR register to get the starting address of screen memory, then draws all 256 characters from the default character set in a nice rectangle:
10 SC=WPEEK($D060) + WPEEK($D062)*65536
20 FOR Y=0 TO 3
30 FOR X=0 TO 63
40 POKE SC+Y*80+X,Y*64+X
50 NEXT X
60 NEXT Y
WPEEK() is a special form of PEEK() that reads two bytes of memory and interprets them as a 16-bit value stored in little endian order. Line 10 reads all four bytes, and assembles them into a 32-bit number, in this case the address stored in SCRNPTR.
You can change the location of screen memory at any time by updating this register. This can be used for switching between multiple displays stored in different regions of memory, or for techniques such as screen scrolling.
Try this. Set the SCRNPTR address to $6000:
WPOKE $D060,$6000:WPOKE $D062,0
You are now looking at the contents of memory at address $6000, interpreted as screen codes by the VIC-IV chip, one byte per character. If you did this on Xemu, the screen is probably filled with @ symbols, which use a screen code of 0. On the MEGA65, this could be all manner of crazy characters, whatever happens to be in memory at that location.
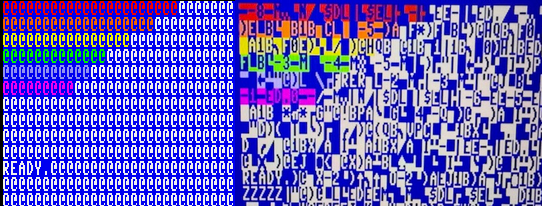
If you did this just after switching on the computer, you may also see that the characters in the top left corner have retained the colors of the rainbow bar of the welcome banner. The VIC keeps screen codes and color codes in separate areas of memory, and so far all you have done is tell the VIC to look somewhere else for screen codes.
Another thing to notice: the screen editor’s READY. prompt and cursor have followed you to the new screen location. It’s cool that this seems to work, but note that not every feature of the KERNAL, screen editor, and BASIC know how to do this. Some features of the KERNAL still believe screen memory is where it originally put it. Reset the screen editor, including its SCRNPTR, by holding Run/Stop and tapping Restore. Or just reset the computer.
Low and high resolution text modes
The Commodore 64’s VIC-II is capable of text in 40 columns and 25 rows. This was extended for the Commodore 65’s VIC-III to also support 80 columns. The VIC-III can switch between these two modes. In fact, this is how GO64 mode works: it downshifts the VIC-III into its VIC-II compatibility mode, including adjusting the screen to 40 x 25 text mode.
The 640-pixel wide 80-column text mode is controlled by the H640 register, bit 7 of address $D031. You can switch to 320-pixel wide 40-column text by clearing this bit:
CLRBIT $D031,7
Naturally, 40-column text uses less screen memory than 80-column text. It’s still using the same screen memory location of SCRNPTR, but only reading the first 1,000 bytes to describe the 40 x 25 screen. The memory layout is similar, organized by rows of 40 instead of 80.
Once again, the KERNAL doesn’t know you have changed modes, and still thinks the display is 80 characters wide. Re-enable 80-column mode:
SETBIT $D031,7
The MEGA65 VIC-IV can also double the vertical resolution from 200 pixels tall (25 rows) to 400 pixels (50 rows). This is controlled by the V400 register, bit 4 of $D031. Try enabling it:
SETBIT $D031,3
If you’ve tried the screen editor’s 80 x 50 mode before, this might look familiar—except there’s a bunch of garbage on the bottom half of the screen. Also, if you try typing multiple lines, it scrolls at line 25. What’s going on?
You guessed it: the KERNAL doesn’t know you enabled V400 mode in the video chip. The VIC-IV is now reading 4,000 bytes of screen memory starting at the screen editor’s internal location. This space is not meant to hold so many screen codes, and the KERNAL is using the latter 2,000 bytes for something else. Restore sanity by disabling V400 mode:
CLRBIT $D031,3
But wait, we know that the screen editor does support an 80 x 50 mode. Press Esc then 5 to enter this mode, and notice that the screen is nice and clean, and you can use the full space. How does this work?
We can get a hint by inspecting the SCRNPTR register while this mode is active:
PRINT HEX$(WPEEK($D060) + WPEEK($D062)*65536)
Notice the address that it prints. Switch back to 80 x 25 mode (Esc then 8) and enter the command again.
The screen editor uses a different SCRNPTR address for 80 x 50 mode, switching to a location with more space to use as screen memory. It also keeps track of which mode you selected, so it knows how many rows and columns it should be using in this space. It does not check the H640 and V400 registers in case some smart aleck changed them, so it is easily fooled if you don’t switch screen editor modes properly.
Can the VIC-IV display text 40 columns wide and 50 rows tall? Only one way to find out.
Color memory
Each character on the screen has a corresponding color code assigned to it. The code refers to a color defined in a palette. In the text modes we’ve seen so far, the assigned color becomes the foreground color for the character: referring to the character set images, the VIC draws an “on” pixel in the character’s color, and an “off” pixel in the background color.
Programming color memory is a bit weird.
The VIC-IV maintains a whopping 32 kilobytes of color memory from address $FF8.0000 to $FF8.7FFF. By default, color memory starts at the beginning of this range. The memory layout is the same as screen memory. An 80 x 25 text screen uses the first 2,000 bytes of this range for color data.
PRINT CHR$(147);"A"   : rem: Put an A in the corner

POKE $FF80000,4       : rem: Make it purple.
You can adjust the starting address of color memory, but only within this range. The COLPTR register at $D064 to $D065 stores a 16-bit offset to the start of color memory. Think of it as the last four hexadecimal digits after “FF8.”
WPOKE $D064,$07D0     : rem: Color memory starts at FF8.07D0

POKE $FF807D0,7       : rem: Make the A yellow.

WPOKE $D064,$0000     : rem: Color memory starts at FF8.0000.
                      : rem: A is purple again.
Buffer switching
Imagine a program that maintains two screens of 80 x 25 text. Such a program would determine two locations in memory for the 2,000 bytes of screen memory per screen, and set SCRNPTR to the starting address of the screen to be displayed. The program would also determine two locations in color memory for 2,000 bytes per screen, and set COLPTR to the current screen’s color data.
By changing the VIC pointers, a program can make a big change to the display using very little CPU time. While the user is looking at one screen, the program draws the next screen in the other set of memory, then at the last millisecond, it changes the pointers. As soon as the pointers have changed, the VIC immediately starts drawing from the new screen data. From the user’s perspective, the screen switch is instantaneous, and they never see any of the computation that goes into updating screen and color memory.
There is a teensy amount of time after updating SCRNPTR and before updating COLPTR, such that the VIC is drawing from the second screen’s screen codes and the first screen’s color codes. If this is a concern for your program, you can use a VIC raster interrupt to make sure the switch happens while the VIC is drawing the top or bottom border. By the time the raster beam gets to drawing characters, both pointers are updated.
Color memory windows
The Commodore 64 only supports a 40 x 25 character graphics screen, and so only ever needs 1,000 bytes of color memory. The VIC-II keeps these bytes among the I/O registers, at addresses $D800 to $DBFF (that’s dee-bee-eff-eff).
The Commodore 65 introduced 80-column mode, requiring 2,000 bytes of color memory. To keep this data among the registers and stay compatible with the C64, the VIC-III has a one-bit register, CRAM2K, bit 0 of $D030, that switches the upper I/O registers to act as more color RAM, extending the range: $D800 to $DFFF.
To make it possible to access all 2,000 bytes of color memory without hiding I/O registers, the C65 also exposes the same memory at $1F800 to $1FFFF. This is outside the first 64 KB of memory, so a program has to use the 4502’s indirect addressing modes to access it. (A program could also use the 4502’s MAP feature to associate 16-bit addresses with 28-bit addresses. Personally, I only use MAP for executing CPU instructions in upper memory, and use indirect addressing for data. You have to be careful with the MAP feature to not accidentally un-MAP your program while it is running.)
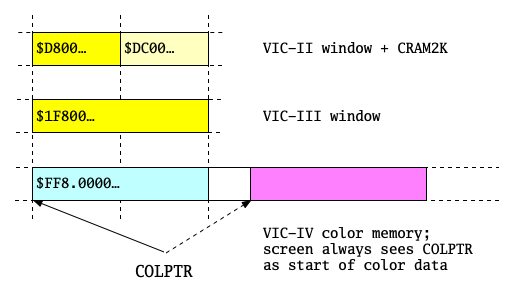
The MEGA65 supports all of this. $D800 and $1F800 are the beginnings of two equivalent windows into the color memory starting at $FF8.0000. If the first 1,000 or 2,000 bytes of color memory are all you need, you can use these legacy methods, perhaps for the added convenience of $D800 being in the first bank. Remember that 80 x 50 text mode uses 4,000 bytes of color memory, which is more than these windows can see.
There’s one rather large caveat: these windows always reflect the top of color memory at $FF8.0000, not where COLPTR is pointing. If you set COLPTR to $0800, $D800 and $1F800 will continue to represent memory at $FF8.0000, and won’t be able to reach any of the memory that the VIC is using to paint color on the screen. The windows don’t move, which limits their usefulness.
If you’re not using the windows, there’s a neat trick you can do here. By setting COLPTR to $0800, the windows point to memory that’s not being used, from $FF8.0000 to $FF8.07FF. With this setting, you can use the windows as regular memory for other purposes. (If you need to be really technical, this memory is slightly slower to access than other memory in banks 0 through 5, but your program might not notice.)
Color and character attributes
Each byte of color memory stores eight bits of information. I mentioned that five of these bits select the color, with the ability to select any of the first 32 colors in the palette. The remaining three bits apply interesting text effects to the character.
The color bits are 0, 1, 2, 3, and 6. Another way to think of it is, bits 0 to 3 select one of 16 colors, and bit 6 selects either the first 16 colors (0 to 15) or the second 16 colors (16 to 31).
PRINT CHR$(147);"A"      : rem: Put an A in the corner

POKE $FF80000,%00000100  : rem: purple (4)
POKE $FF80000,%00001111  : rem: light grey (15)
POKE $FF80000,%01000000  : rem: "guru meditation" red (16)
C65 documentation and the MEGA65 documentation describe bit 6 as “bold.” The idea is for a program to set colors 16 to 31 to be “bold” versions of colors 0 to 15, when such an effect is desired. Neither the C65 nor the MEGA65 have a boldface text effect, it’s just using a different set of colors.
Bit 4 causes the character to blink in a steady pattern. With only this attribute set, the VIC alternates between two states: draw “on” pixels in the foreground color, or draw all pixels in the background color.
Bit 5 reverses the character. With a monochrome character set, this means that “off” pixels are drawn in the character’s foreground color, and “on” pixels are drawn with the background color.
Bit 7 underlines the character. The bottommost line is drawn with all “on” pixels, regardless of how the character appears in the character set.
Things get a little dicey when you turn on more than one character attribute at a time. This was so confusing to me at first that I filed it as a bug years ago, and even submitted a “fix” to make it more intuitive. I eventually discovered that Commodore explicitly intended it this way, so I removed the “fix” in favor of a backwards-compatible feature request that we have not yet implemented.
For starters, “reverse” does not take effect if the “bold” palette is selected. There is no way to reverse a character and also set it to a color from 16 to 31.
“Blink” has a different behavior if any other attribute is set. With no other attributes set, “blink” causes the foreground pixels to alternate on and off. With any other attribute set, including the “bold” attribute, “blink” causes the attributes to blink on and off, and the character stays visible. Blink + underline: blink just the underline. Blink + reverse: alternate normal and reverse. Blink + bold: alternate between the two sets of colors.
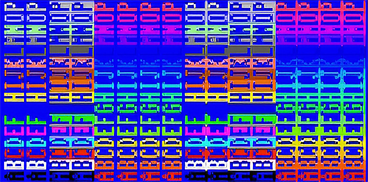
Here’s a program that demonstrates every attribute combination and color:
10 PRINT CHR$(147); :rem (Notice the semicolon.)
20 FOR Y=0 TO 15
30 PRINT "ABCDEFGHIJKLMNOP ";Y
40 FOR X=0 TO 15
50 POKE $1F800+Y*80+X,Y*16+X
60 NEXT X
70 NEXT Y
I don’t like how this makes certain combinations inaccessible, especially the ability to blink a character that’s using the “bold” color set between visible and invisible. But I eventually convinced myself that Commodore had good intentions, and if we want to add more control over the attribute behaviors, we need to preserve Commodore’s design as the default. At least it’s quirky.
The blink + reverse effect resembles the blinking cursor of the screen editor. It’s interesting to notice that this is not actually how the blinking cursor works. Just as on the C64, the C65 default character set consists of 128 characters, followed by their reversed equivalents, for a total of 256 characters. The cursor blink is actually modifying the screen code, switching between the reversed and non-reversed variants of the character under the cursor. That seems like a waste considering there’s a blink + reverse mode that achieves a similar effect. The cursor could just set these attributes, and the default font could contain 128 more useful characters.
Unfortunately, an attribute-based cursor would be constrained by the unusual way that attributes combine. If an attribute-based cursor were above a character using the “bold” palette, the cursor would try to set “bold” and “reverse,” which cancels the “reverse” effect. Earlier versions of the MEGA65 ROM attempted this, and we had to go back to the screen code-based cursor because users noticed that the cursor would vanish when using the upper 16 colors.
A look ahead: video modes
In this Digest, we introduced the main idea behind character graphics: representing a screen as a coarse grid of characters, instead of a fine grid of pixels. Restricting the flexibility of the display to a common category of applications saves memory and compute time, an essential resource on microcomputers. We saw how the default text mode of the MEGA65 displays a grid of 80 x 25 characters, selected from a set of 256 characters, each displayed in one of 32 colors. Programs can manage display memory using pointer registers. We also took a brief look at how the text display can be switched between two horizontal resolutions (320 pixels or 640 pixels) and two vertical resolutions (200 pixels or 400 pixels), each combination fitting a different number of characters on the screen.
Vintage video systems typically support multiple video modes to give programs the opportunity to choose their own tradeoffs of capabilities and costs. Over several Digest articles this year, we’ll explore more features of the MEGA65’s character graphics system. We’ll see that many of these features involve switching modes that adjust specifications and change the way screen and color memory are interpreted by the VIC.
Next month, we’ll dive deeper into character sets and color palettes, both of which can be completely customized by a program. We’ve visited custom character sets a few times in previous Digest issues, and it’s about time we lay all the cards out on the table. We’ll also play around with some multi-color character graphics modes from the VIC-II and VIC-III, and work our way up to the crown jewel of MEGA65 VIC-IV character graphics, Super Extended Attribute Mode.
If you’re as excited about this series as I am, please consider supporting this Digest. Visit: ko-fi.com/dddaaannn
So much to do, so little time! See you next month.
— Dan