Pixie Power
Pixie Power. Dan’s MEGA65 Digest for April 2026.

The MEGA65’s Raster Rewrite Buffer allows programs to draw characters on top of other characters, with the option to treat certain pixels as transparent. This enables all manner of graphical effects and techniques involving layers. In the previous Digest, I was able to use the RRB to sketch the user interface of a military strategy game, with terrain, soldiers, vehicles, indicators, and user interface elements in a 20-by-12 grid of 16-color 16-by-16 tiles, all in overlapping layers. Each tile is drawn separately, so it’s easy to imagine that this game could move the game objects across the terrain, like moving pieces across the spaces of a board game.
In this Digest, we’ll look at more features of the Raster Rewrite Buffer that open up even more possibilities. Specifically, we’ll see how to position layered game objects not just in a tile grid, but in arbitrary pixel positions on the screen. This is similar to VIC-II hardware sprites, but managed entirely by the program manipulating the RRB. Graphics programmers sometimes call techniques like these “soft sprites” to distinguish them from sprite features built into the video chip. Years ago, the MEGA65 community proposed that we call them pixies.
The power of pixies, coming up after these project announcements!
Dark Reaper
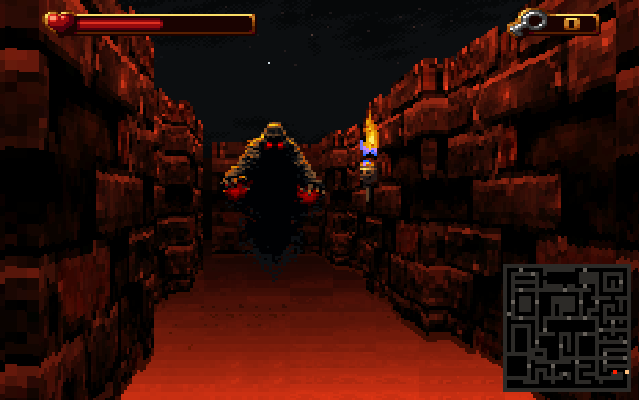
Dark Reaper, by MirageBD.
Dark Reaper is a new game by long-time MEGA65 contributor Lars Verhoeff (MirageBD), with an impressive smoothly-animated 3D maze engine, textures and lighting that really show off the MEGA65’s dynamic range, and atmospheric music and sound. Collect keys, open doors, find secret passages, and above all: avoid the Reaper. The map is essential to finding your way around and not getting caught.
DOS/65
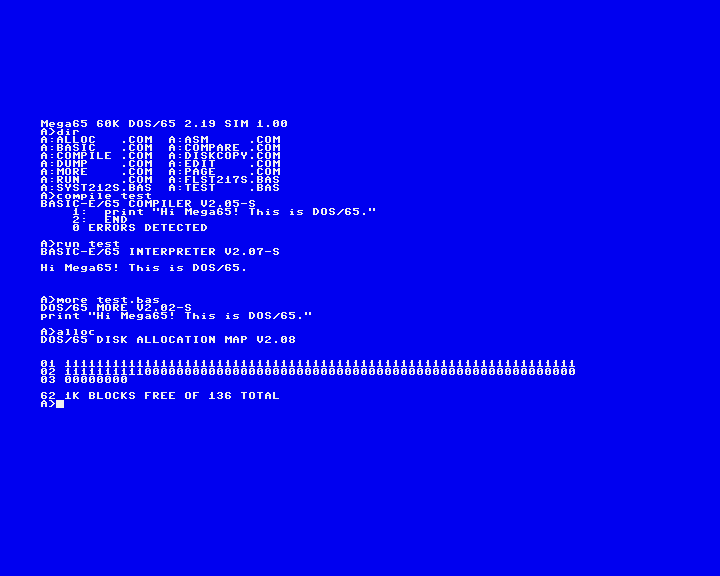
DOS/65, MEGA65 port by Stefan Eilers.
The original DOS/65 was a CP/M workalike for the 6502 processor, by Rich Leary in 1982. Stefan Eilers has ported it to the MEGA65. You can download it from Filehost. The filesystem is compatible with CP/M version 1.4 and later, though of course a 6502 computer cannot run 8080/Z80 programs.
Don’t miss Stefan’s documentation, and the Github repo.
MegaPC
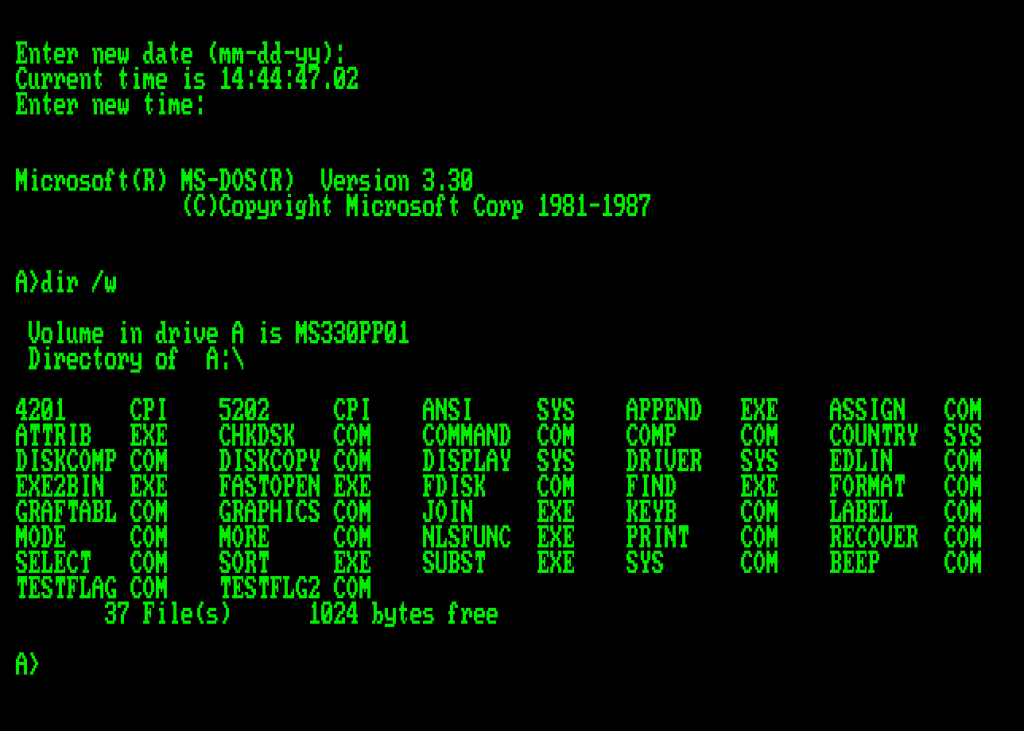
MegaPC, an 8086 emulator by xlar54.
Extending his emulator series, xlar54 has published an 8086 PC emulator capable of running MS-DOS, with a monochrome display and two virtual floppy drives.
You’ll need a DOS boot disk. Popular DOS apps work, though not always at full speed. See the Github repo for more information.
More Featured Files
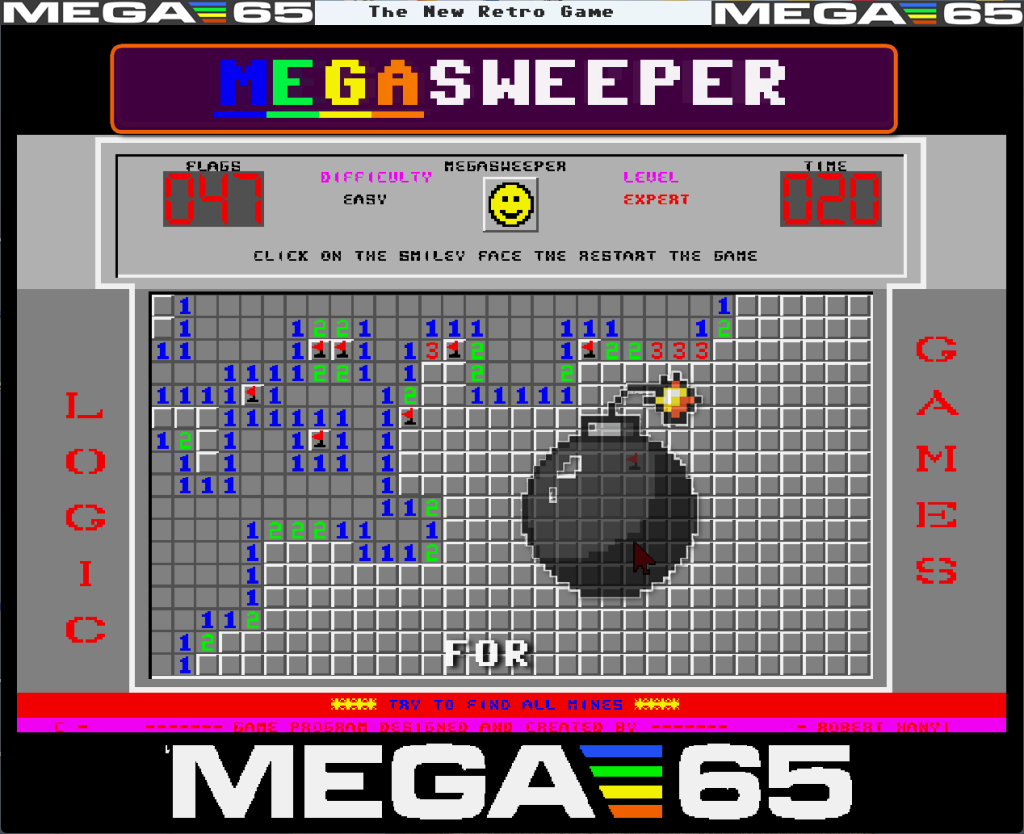
MegaSweeper65, by Hanyic Róbert.
- MegaSweeper65 by Hanyic Róbert, a new faithful recreation of Minesweeper, enhanced with MEGA65 graphics and sound. Use a mouse in port 2 to place flags and guess the locations of the mines. Download the playable demo on Filehost, then proceed to the itch.io page to purchase the full version for just $6 USD.
- Snac-Snake, a featureful snake game by ToneDeF, written in Eleven.
- Overlord by Drex has received a major update. Version 2.0 features multiple overlords, an overhead maze view, and more improvements.
- FullScreenScrool, by Hanyic Róbert, a demo of a full-screen scrolling playfield, pushing out the screen borders for more screen real estate. Control the scroll with a joystick in port 2.
- MegaCalc65 by BOBELE, an experiment in AI vibe coding in BASIC65. The result is a small VisiCalc spreadsheet clone, though BOBELE says this version’s BASIC source is not very readable.
- piso’s C16 / plus/4 core has had a major update and is now feature complete.
- Space Invaders core by AwesomeDolphin, an FPGA core based on the original Space Invaders arcade machine. You’ll need to get the Space Invaders ROM files from the MAME ROM set.
- Blade Runner demo, a slideshow with music, by Drex. Features a slide-in effect for each image.
Tactical Strike graphics demo
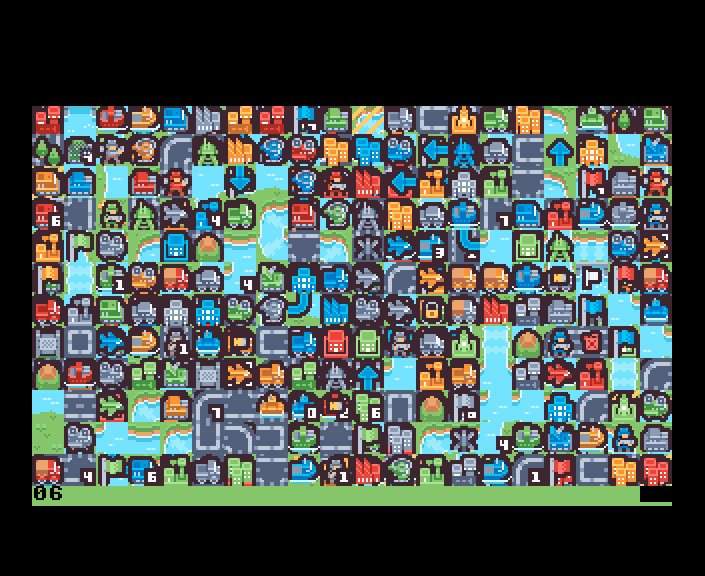
I have been illustrating the most recent Digest articles on RRB graphics with a sketch of a game I’ve been calling “Tactical Strike.” Several people have asked to see these demos in their full form, beyond the excerpts I’ve been including in the newsletter.
You’ll have to forgive the crudeness of this model, I haven’t had time to paint it or to build it to scale. But if you’re interested:
The tactical.d81 disk image includes several display demos written in BASIC 65, along with the Tactical Strike tileset (NCM characters and palette) as data files. Each demo sets up the 20 x 12 tile display in the same way, as described in the previous article.
DISPLAY: Shows one tile at a time in the top left corner. Press A and D to cycle through them; press space to exit.DISPLAY2: Displays the entire tileset. Press space to exit.DISPLAY3: Displays the entire tileset, using a general purpose subroutine that can draw a given tile at a given grid position. (Run/Stop + Restore to exit. No particular reason, I think I just wanted the program to be shorter so I left out the reset code.)DISPLAY4: Simple GOTOX demo, draws a red soldier on top of flowers.DISPLAY5: Stress test of layer drawing. Press any key to draw another layer of random tiles. Adjust theLC = 11in line 10 to watch it fall apart at different points on real hardware and in Xemu. The layer count is in the last row. Also there’s a fix for the glitch in the lower right corner in other demos.DISPLAY6: A gameplay sketch, based on the Kenney Tiny Battle demo scene, using the full-layer technique. The little green corner in the piece of road over the water is just me being lazy: I put the road and water tiles in the same layer, but I could have added one more layer for the road to be properly above the water.
DS-MEGA65 is a version of DISPLAY3 written in assembly language. None of these demos strictly depend on features of BASIC65—it’s all register and memory manipulation—though I do use commands like WPOKE and SETBIT to illustrate the register concepts. This assembly language version also simplifies the code by embedding the tileset data directly in the program. Instead of loading the tileset into bank 4 from disk, I just tell the assembler to include it with the program at address $2800 in bank 0, and refer to those addresses in screen memory directly.
Someone asked me if a program running in GO64 mode could use these features. It sure can! You just need to switch the VIC from VIC-II compatibility mode into VIC-IV mode, like so:
; Switch to VIC-IV mode.
lda #$47
sta $d02f
lda #$53
sta $d02f
The only other difference between d3-mega65.asm and d3-go64.asm is the start address, and the corresponding address in the BASIC bootstrap preamble. The rest of the code is identical. To try the GO64 version, just load and run it like any other program in GO64 mode.
MOUNT "TACTICAL.D81"
GO64
YES
LOAD "D3-GO64",8
RUN
About face!
So far, I’ve been drawing the tiles as they appear in the tileset. In the case of soldiers and vehicles, everyone is facing to the right. That’s not too bad given the board-game-like style of the display, but in the real game each team is going to start on opposite ends of the field and advance toward each other. Without changes, a soldier marching right to left will look like it is walking backwards towards the enemy team.
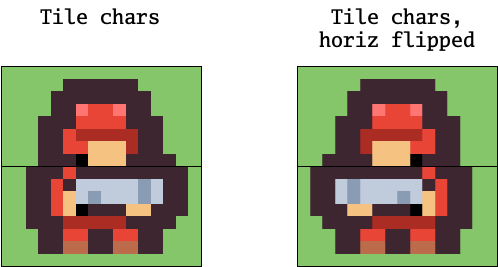
Of course, one possible solution is to have two tiles for each soldier, one facing to the left and one facing to the right. But the VIC-IV can help us out here. In the common case where we just want the same image flipped horizontally, we can just ask the VIC-IV to use the same graphic, and draw it flipped.
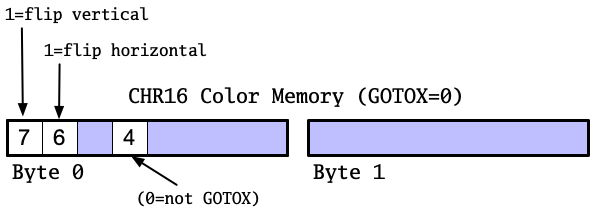
To draw any SEAM character flipped horizontally, set bit 6 of byte 0 of its color value.
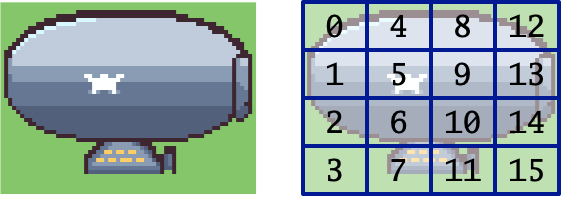
Tactical Strike tiles are one NCM character across (16 pixels) and two characters tall (8 x 2 = 16 pixels). To flip the tile horizontally, Tactical Strike sets bit 6 of byte 0 of the color value for both characters.
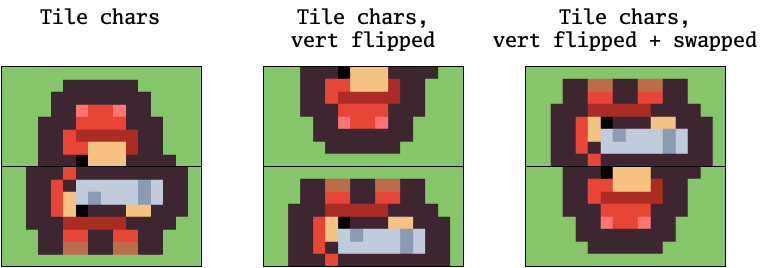
Unsurprisingly, the VIC-IV can also flip a SEAM character vertically. To do so, set bit 7 of byte 0 of its color value.
If Tactical Strike had a use for flipping a tile vertically—and perhaps it doesn’t given the style of the game, but let’s just consider—notice that a tile is two NCM characters stacked vertically. To flip the full tile vertically, it would need to set bit 7 of byte 0 of the color value of both characters, and it would have to swap the characters themselves, so the bottom character is on top and vice versa.
Here’s a trivial example of drawing a left-facing red soldier at a pre-calculated screen location:
POKE $50004,$6E
POKE $50005,$11
POKE $5002C,$6F
POKE $5002D,$11
POKE $FF80004,$48
POKE $FF80005,$C0
POKE $FF8002C,$48
POKE $FF8002D,$C0
Here’s a brief review of where these numbers come from:
- In this example, screen memory is at $5.0000 (established by setting the SCRNPTR register), and color memory starts at $FF8.0000.
- In this example, the red soldier is the third character on each of the first and second rows. LINESTEP is 40 = $28. SEAM characters take two bytes each, so the memory offsets for the two characters are $04 for the top character and $2C for the bottom character.
- The character set addresses for the red soldier are $4.5B80 and $4.5BC0, so the corresponding screen codes are those addresses divided by $40: $116E and $116F, respectively.
- Color memory declares that these are NCM characters, are flipped horizontally, use sub-palette $C, and use color $0 of that sub-palette for pixel value $F, like so:
Color memory byte 0:
  $48 = %0100 1000
          ^   ^ = is NCM
          = flip horizontally

Color memory byte 1:
  $C0 = %1100 0000
              ^^^^ = $F color for this NCM character
         ^^^^ = sub-palette for this NCM character
See DISPLAY7 on the disk. What changes would you make to flip the soldier upside down?
Forward march!
Tactical Strike uses the Raster Rewrite Buffer to draw game objects onto the terrain. To do this, it populates the beginning of a row of screen memory with terrain characters, then uses a GOTOX instruction to reset the draw position to the game object’s X position. This instruction is followed by the character for the game object itself, which is drawn on top of the terrain at the new X position.
I wrote my tile drawing routine to keep all tiles arranged in a 20 x 12 grid. For example, to draw a red soldier in the fifth column on a row, the routine could use a GOTOX instruction to set the draw position at X = (5 - 1) * 16 = 48, the pixel coordinate of the left-hand edge of the fifth column.
When the player moves the soldier, I want to animate the soldier marching across the field. I could just have him clomp across the grid locations, leaping 16 pixels at a time. That has a nice retro feel to it, but it’s not the only option. GOTOX takes a pixel coordinate, not a grid coordinate, so I could slide the soldier left or right by changing the GOTOX value a small number of pixels per animation frame.
For example, I could slide a soldier from one tile column to the next by one pixel per frame over 16 frames. In NTSC video mode at 60 frames per second, that would take 16/60 = 0.26 seconds. In PAL video mode at 50 frames per second, that’s 16/50 = 0.32 seconds.
See DISPLAY8, which animates a patrolling soldier, including horizontal flip.
Last month, we discussed several different strategies for using GOTOX to draw layers, including drawing full layers with “GOTOX = 0” instructions between them. Notice that to animate individual game objects, each object needs its own GOTOX instruction: each row starts with a full screen-width of terrain, followed by a “draw list” of graphics objects, each object using one GOTOX instruction to set its position followed by the graphics character (or characters) for the object. This provides enough flexibility to locate each object independently from other objects on the row, at the expense of some screen memory.
This is the general idea behind pixies. The program draws the background layer (or layers) into screen and color memory, one row at a time, followed by GOTOX instructions and characters for each pixie that appears on the row. Pixies can overlap, and must appear in screen memory in their desired order, from back to front. The VIC draws the entire row—background and pixies—by reading each row of screen memory from left (lowest memory address) to right (highest memory address), following all of the “draw a character” and “GOTOX” instructions in the order they appear.
Up and down
Positioning pixies at arbitrary horizontal positions is pretty straightforward: just give the GOTOX instruction the desired pixel coordinate to start drawing the next character. The VIC draws the full width of the character from the left edge to the right edge, potentially drawing it across what we normally think of as two character columns—or tile grid columns in the case of Tactical Strike.
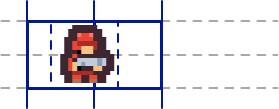
You can also use the Raster Rewrite Buffer to position pixies at arbitrary vertical locations. This takes a bit more effort. We want something similar to horizontal positioning, where a character is drawn across two character rows, with some of the character on one row and the rest of the character on the next row. But the VIC draws one row at a time, and can’t leave the current row to go draw somewhere else on the screen. It needs our help to understand how much of a given character to draw on a given row, and where to start drawing it. The mechanism for this is unusual, but it’s designed in a way that’s useful for common graphical effects.

Let’s consider an example in detail. Say we want to draw the red soldier such that its upper-left corner is at pixel coordinate X=0, Y=3. The soldier tile is 16 pixels tall, using two 16-by-8 NCM characters in the character set. To appear at vertical position Y=3, these two characters have to be drawn across three character rows:
- The first row has three empty pixel rows followed by the top five pixel rows of the top character of the soldier.
- The second row has the bottom three pixel rows of the top character, and the top five pixel rows of the bottom character.
- The third row has the bottom three pixel rows of the bottom character, and five empty pixel rows.
The Raster Rewrite Buffer provides two separate features to make this possible.
The character data Y offset
Normally, when the VIC draws a character on a character row, it reads the first pixel row of that character’s pixel data and draws it on the first vertical pixel position of the character row, then the second for the second, and so on. For FCM/NCM characters, it gets the address of the first pixel row of the character by taking the screen code and multiplying by $40, and reads eight bytes of character set data for each pixel row.
You can tell the VIC to start reading character data on a different pixel row by setting a character data Y offset. An offset of +1 would tell the VIC to start reading the character data one row later: use the second pixel row of the character data for the first vertical pixel position, then use the third row of the character in the second position, and so on. This effectively shifts the character up by one pixel, cutting off the top. When the VIC gets to the eighth position, the +1 offset tells it to read the first pixel row of the next character in the character set.
One way to think about this is to imagine the entire character set stacked vertically. When the VIC draws an FCM/NCM character, it uses the screen code times $40, plus the character data Y offset times 8, as the address of the first pixel row. You can use the screen code and the offset to position an 8-pixel-high window anywhere in the character set stack, and the contents of this little window are drawn into the character row. The offset can be in the range -7 to +7.

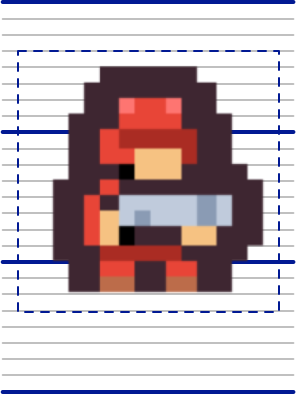
To draw the red soldier at vertical position Y=3, we use a character data Y offset of -3 for all three rows. Each character row works as follows:
- In row one, we use the screen code of the top character of the red soldier. The VIC draws three rows of the previous character, followed by five rows of the red soldier’s top character.
- In row two, we use the screen code of the bottom character of the red soldier. The VIC draws the remaining three rows of the top character, followed by the top five rows of the bottom character.
- In row three, we use the screen code of the next character in the character set. Combined with the offset of -3, this uses the bottom three rows of the bottom character for the red soldier, followed by five rows of the next character.
Tada! The red soldier now appears at pixel coordinate Y=3! That’s what we wanted, right?
Row masking
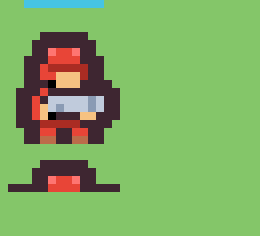
OK, rows 1 and 3 don’t look quite right yet. They’re stealing pixel rows from adjacent characters in the character set to fill out the set of eight. We need another feature to tell the VIC to not draw anything on those pixel rows.
You can tell the VIC to skip drawing specific pixel rows by setting a row mask. This mask can enable or disable any of the eight pixel rows being drawn to the current character row. Combined with the character data Y offset, this completes our solution for drawing pixies at arbitrary vertical positions, like so:
- In row one, we use a row mask that hides the first three pixel rows, and shows the next five. This hides the three rows from the unwanted previous character, and only draws the top five pixels of the red soldier.
- In row two, we enable all eight pixel rows to be drawn: three bottom pixels of the soldier’s top character, five top pixels of the soldier’s bottom character.
- In row three, we use a row mask to show the first three pixels, and hide the next five. Only the last three pixels of the soldier’s bottom character are drawn.
In other words, all masked rows appear as transparent, and we can omit the neighboring pixels from the result of offsetting the character set data.
Implementing Y offsets and row masks
The character data Y offset and the row mask are part of the GOTOX instruction. This has two implications: they are set independently of the characters, and they apply to all subsequent characters on the character row, until they are changed by another GOTOX instruction, or they are reset at the end of the row.
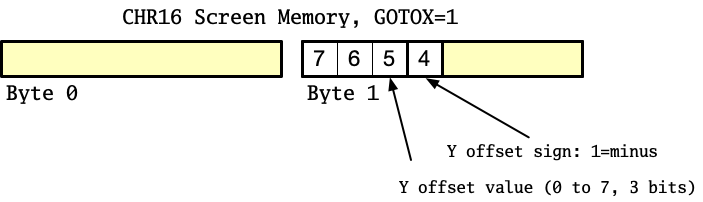
You set the Y offset using bits 4 through 7 of the GOTOX instruction’s screen memory byte 1. Bit 4 is the sign bit: set it for a negative offset, or clear it for a non-negative offset. Bits 5-7 are the value 0 through 7.
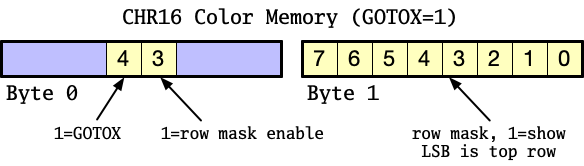
To enable the row mask, set the GOTOX instruction’s bit 3 of color memory byte 0. Then set the row mask using all eight bits of color memory byte 1. Each bit of the row mask corresponds to a pixel row, where bit 0 is the top-most row, bit 1 is the second row, and so on. Set the row mask bit to show the row.
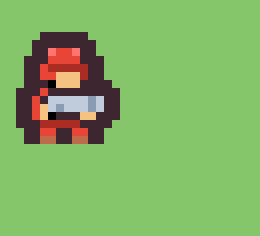
Here’s the complete picture for drawing the red soldier at pixel coordinates X=0, Y=3. In this example, each row has 40 bytes for the background, 2 bytes for a GOTOX instruction, and another 42 bytes for whatever else is needed on the row. The o variable is the screen memory offset for that row’s GOTOX instruction. The soldier characters follow the GOTOX instructions on each row.
REM ROW 0:
O=0*42*2+40
WPOKE $50000+O,     $7000 : REM GOTOX SCREEN MEMORY
WPOKE $FF80000+O,   $F898 : REM GOTOX COLOR MEMORY
WPOKE $50000+O+2,   $116E : REM CHAR SCREEN MEMORY
WPOKE $FF80000+O+2, $C008 : REM CHAR COLOR MEMORY

REM ROW 1:
O=1*42*2+40
WPOKE $50000+O,     $7000 : REM GOTOX SCREEN MEMORY
WPOKE $FF80000+O,   $0090 : REM GOTOX COLOR MEMORY
WPOKE $50000+O+2,   $116F : REM CHAR SCREEN MEMORY
WPOKE $FF80000+O+2, $C008 : REM CHAR COLOR MEMORY

REM ROW 2:
O=2*42*2+40
WPOKE $50000+O,     $7000 : REM GOTOX SCREEN MEMORY
WPOKE $FF80000+O,   $0798 : REM GOTOX COLOR MEMORY
WPOKE $50000+O+2,   $1170 : REM CHAR SCREEN MEMORY
WPOKE $FF80000+O+2, $C008 : REM CHAR COLOR MEMORY
Just to be sure, let’s walk through row 0:
- GOTOX screen memory low byte =
$00=%0000 0000: X is 0 - GOTOX screen memory high byte =
$70=%0111 0000: Y offset is -3 - GOTOX color memory low byte =
$98=%1001 1000: transparent, GOTOX, rowmask enabled - GOTOX color memory high byte =
$f8=%1111 1000: hide rows 0-2, show rows 3-7 - Character screen memory bytes =
$6e$11:$116ex$40is char set address $4.5B80 (red soldier top) - Character color memory low byte =
$08=%0000 1000: This is an NCM character - Character color memory high byte =
$c0=%1100 0000: NCM sub-palette$C;$Fvalue is color$0
Try working out the other rows.
See DISPLAY9 on the disk. Try enabling and disabling the row mask to see the difference. Note that Xemu cuts off the top row in this example; see notes near the end of the last Digest.
Giant pixies
The Y offset feature worked out nicely for Tactical Strike. Each 16-by-16 tile is two NCM characters arranged vertically, and the two characters for each tile appear next to each other in the character set. When setting the -3 offset for row 2 in our example, we got exactly what we wanted: three rows from the top character and five rows from the bottom character.
This suggests a general rule for organizing character sets for large pixies: top to bottom, left to right. This makes it easier to use unmasked offset characters for the interior rows, taking advantage of the VIC’s ability to read rows from adjacent characters, as part of pixie vertical positioning.
Building a pixie framework
It may not look like it yet, but we now know enough VIC-IV graphics features to implement Amiga-quality games! Super Extended Attribute Mode gives us full-color characters with a 256-color palette of 23-bit color. The Raster Rewrite Buffer lets us draw character graphics in layers with transparency, at arbitrary pixel locations. We can use these techniques to implement “pixies,” and draw a large number of them to the screen, on top of detailed backgrounds. A given object can be multiple characters wide and tall, and we can include multiple frames of animation in our character set and switch between them just by changing screen codes.
Knowing how it works and getting it to work are two different things. While we now know which VIC-IV features can be used to implement pixies with GOTOX instructions across multiple rows of characters, this isn’t how we want to think about pixies in our game code. I just want to be able to say that a game object uses a particular frame of animation from my tileset, and appears at a given set of pixel coordinates. It’d be best if some general purpose library could manage the screen and color memory, character codes and GOTOX instructions, Y offsets and row masks.
RetroCogs, the implementor of the MEGA65 port of RogueCraft DX, is developing GameShell65, an assembly language framework with abstractions for pixies and other graphics techniques based on the RRB. It’s in early stages, but there’s plenty of code to learn from and re-use. Even if you don’t plan to use it, check out the pixie documentation for hints on how to implement a workable pixie system.
Several of the demos on the TACTICAL.D81 disk use a BASIC subroutine to do the heavy lifting for drawing tiles in layers. It might be possible to encapsulate pixie positioning logic in that routine as well, depending on what kind of animations and movement I want the game to have. Whether it’s fast enough to do in BASIC, or if assembly language is needed, also depends on the game.
Of course, there’s still more to discuss about character graphics. There are several character rendering features we still haven’t yet covered. Fast-paced games typically use Direct Memory Access features to manage screen and color memory. And there’s more to say about full-screen scrolling and other special effects. These will have to wait for future Digests!
If you want to see more articles like these, consider supporting the Digest. Visit ko-fi.com/dddaaannn for more info.
See you next month!
— Dan