Roguecraft DX; Introducing the Raster Rewrite Buffer
Roguecraft DX; Introducing the Raster Rewrite Buffer. Dan’s MEGA65 Digest for March 2026.
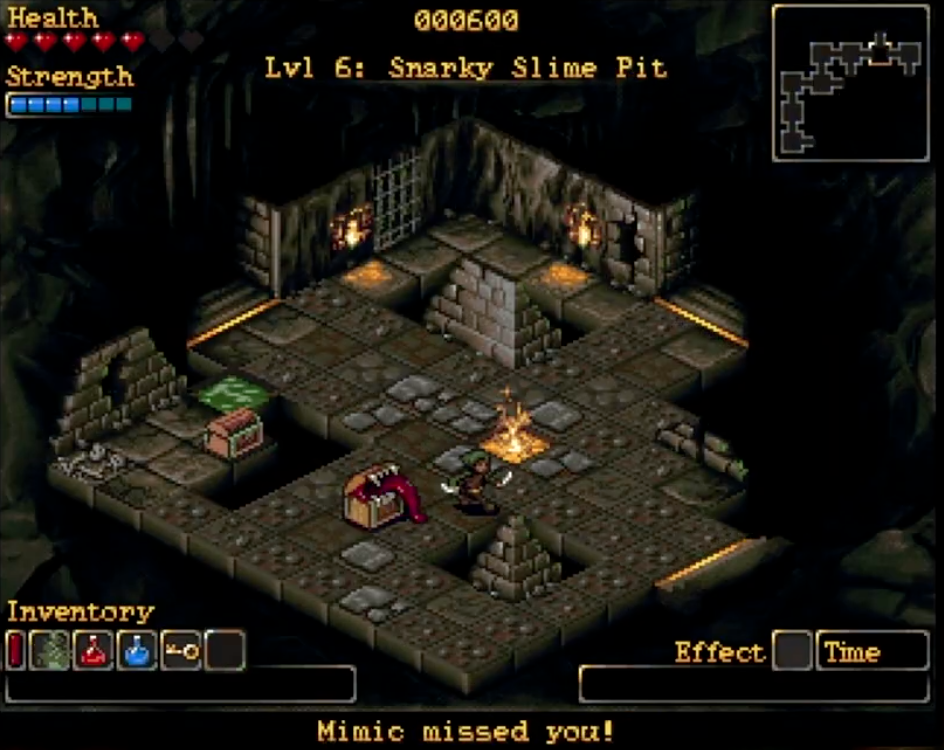
The MEGA65 community is buzzing with the release of Roguecraft DX, a new highly polished commercial game from Badger Punch Games for the MEGA65. Among many other fine qualities, Roguecraft takes advantage of the MEGA65’s full color character graphics features to show animated, colorful foreground figures on a colorful background.
In our continuing series on character graphics, we’ve seen how to prepare colorful high resolution graphics tiles in character sets, and plot characters onto the screen at coordinates in a grid pattern. We’ve also seen how a character set can become a canvas, by spreading all the characters across the screen like a quilt then updating the character set itself. But this is not how Roguecraft achieves a foreground and a background: it would take too much computation to draw and update foreground images onto such a canvas.
Instead, Roguecraft uses a powerful feature of the VIC-IV, called the raster rewrite buffer (or RRB). With this feature, your program can tell the VIC-IV to draw characters on top of other characters, treating some pixels as transparent. Moreover, these characters can be drawn at arbitrary pixel positions. The RRB unlocks a whole new world of graphics capabilities, such as hundreds of fast-moving graphics objects, particle systems, and multiple parallax background layers, all built on top of the character graphics features we’ve seen so far.
In this Digest, we will introduce the raster rewrite buffer through a simple example. We won’t quite reach the sophistication of Roguecraft in one sitting, but we’ll get the general idea, enough to start using it in our own programs.
But first, let’s see what everyone has been up to these last few months!
Roguecraft DX for the MEGA65
Roguecraft DX, the hit arcade dungeon crawler by Badger Punch Games, is now available for the MEGA65! You can get the digital download today, and you can pre-order the physical boxed edition, which is expected to ship in June. Our very own RetroCogs developed this gorgeous adaptation that takes advantage of the MEGA65’s graphics capabilities.
Badger Punch’s instant classic began as a 4 kilobyte game jam title for the Commodore 64, which was later expanded with gorgeous art into the commercial release Rogue64, named Game of the Year in 2022 by FREEZE64 magazine. This inspired the vibrant isometric Roguecraft for the Amiga, with all-new stunning art, animation, and turn-based gameplay. This was later expanded again into Roguecraft DX with more levels, gameplay, and music, originally exclusive to the Evercade modern retro console as a cartridge.
This announcement includes three new versions of Roguecraft DX: the MEGA65 version, an Amiga version (the DX expansions are new), and an all-new Game Boy Color version with a top-down perspective. Of course, I’m most excited for the MEGA65 version, which preserves the color depth of the Evercade art assets.
Purchase Roguecraft DX for the MEGA65 as a digital download on Itch.io, or pre-order the physical boxed edition from publisher Thalamus Digital.
Another still from Roguecraft DX for the MEGA65.
Interview with Paul Gardner-Stephen
RetroTech & Café published an interview with MEGA65 creator Paul Gardner-Stephen about the project.
RT&C: What role does the community play in the evolution of the MEGA65?
Paul: Everything! Our community might not be huge, but it’s still several thousand strong, and a really high proportion of that community are active in making stuff for the MEGA65 or contributing in other ways (and they don’t all require being able to program!). We could have gone for maximum community size as fast as possible, but for us, it’s the quality of experience of being part of the MEGA65 project that makes it so rich and engaging for everyone.
And this is an invitation that we keep offering — be part of us in this crazy but rewarding project. The journey is the destination, and it’s a tremendously exciting and joyful one.
Prog8 and 6502 Fart B*mbs!
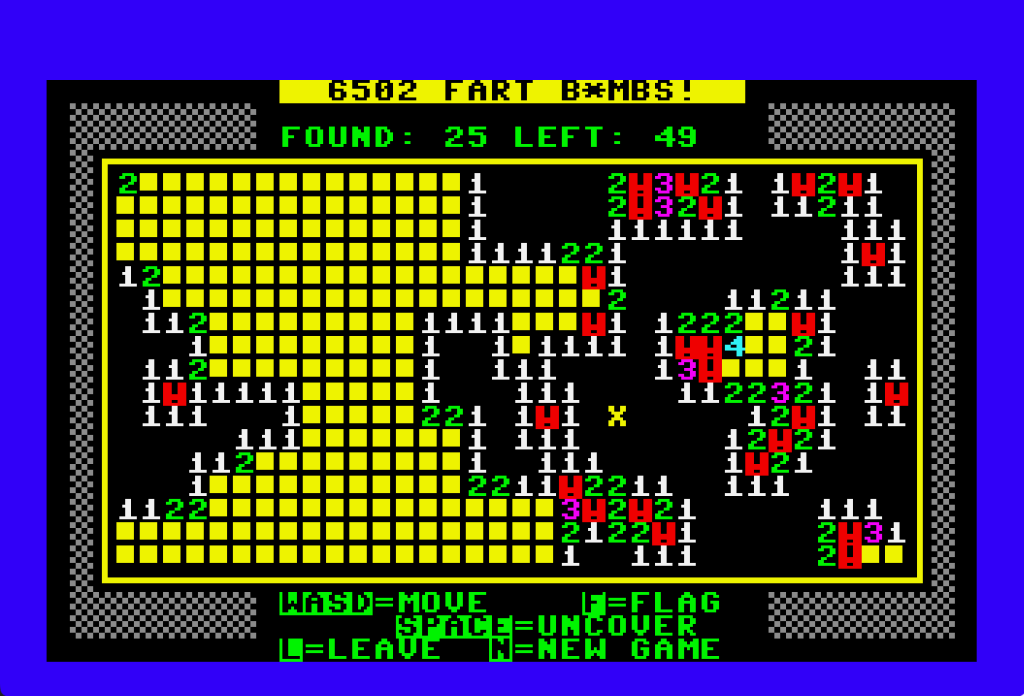
6502 Fart B*mbs! a game for the MEGA65 written in Prog8.
Prog8 is a cross-compiled programming language that targets 6502-CPU-family 8-bit platforms, including the Commodore 64, the Commander X16, and the Wildbits F256 (formerly of Foenix Retro Systems). Thanks to CommodoreSam and Andrew Gillham, Prog8 now has a full working example that can be built natively for the MEGA65. No changes to the Prog8 system were needed to get this to work: you can add support for new platforms with a configuration file.
6502 Fart B*mbs!, a Minesweeper-like logic game, is written in Prog8, and includes a working build configuration for the MEGA65. Sam and Andrew have released the game’s source code under the MIT License, so you can see how it is written, and how to set up a MEGA65 Prog8 project of your own. It’s also a fun game! Try it out!
Commodore plus/4 and Commodore 128 emulators
plus4, a Commodore plus/4 emulator, by xlar54
xlar54 has started a pair of compelling experiments: a Commodore Plus/4 emulator and a Commodore 128 emulator, both for the MEGA65. Unlike alternate FPGA cores, these emulators run in MEGA65 mode, and use the MEGA65’s extra speed to outrun the original CPUs. These do not yet have every feature of their real-world counterparts, including some features of each platform’s unique video capabilities. They otherwise support nearly all of the functionality of the original ROM files, which you must supply.
See the plus/4 project’s Github repo and the C128 project’s Github repo for source code and other useful files.
c128, a Commodore 128 emulator, by xlar54
Featured Files

Chopper, by SirGeldi.
More fun things to check out on Filehost:
- CHOPPER65, by SirGeldi. An original helicopter game, written in BASIC 65.
- Snowflake, by geehaf. A simple demo using a technique based on the raster rewrite buffer.
- SEAM Sinus Demo, by sirlazarus. An assembly language version of the sine curve example at the end of the October Digest, using an assembler-generated sine table.
- Fifth Wins, by Hanyic Róbert. A two-player logic game; play against another player or against the computer. Connect a mouse to play.
- Escape From Spaceship Seven, by GeirS. A MEGA65 port of a space-themed text-based adventure game originally for the Commodore 64 and MAX Machine, in English and Spanish.
- m65cribbage, by Shinobi (aa7ae). The classic card and board game, with a computer opponent.
- FCM library, by xlar54. A featureful graphics library in assembly language that implements multiple screen modes with the MEGA65’s Full Color Mode features. Check out the demo disk on Filehost, and see the Github repo for sources.
- SixSeven, by AwesomeDolphin, a simple single-button gag game written in BASIC 65.
Tactical Strike
Over hill, over dale,
As we hit the dusty trail,
And the caissons go rolling along.
— “The Caissons Go Rolling Along,” Gruber (1908)
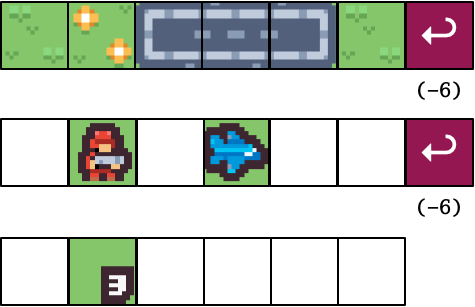
I’ve been playing around with this game tile set by Kenney intended for a military strategy game. There are tiles for fields, lakes, rivers, roads, and bridges to form a landscape, an assortment of military soldiers and vehicles in five color variations, and indicators and icons for user interface elements. The tiles are 16 pixels wide and tall and reasonably low color depth, so they seem suitable for a MEGA65 project.
The image above is my rendering of this tileset on a MEGA65 using NCM graphics over a solid grass-green background color. Most vintage computers are limited to drawing characters on solid background colors like this, and there is a deep history of vintage computer games doing so.
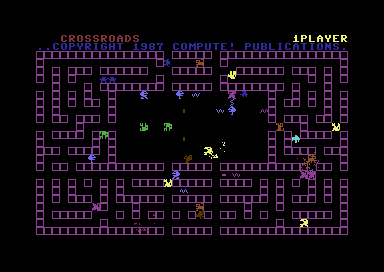
Very many vintage games, such as Crossroads or robotfindskitten, declare the solid background color to be the ground on which characters could walk, using tiles exclusively for foreground objects such as the player, enemies, and obstacles.
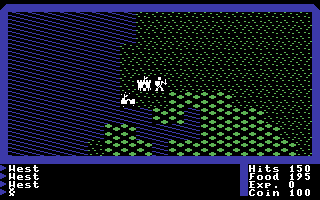
Other games, such as Ultima, Commando B65, or MEGAMAGE, use characters to indicate the ground also, such as grass in a field. When a foreground object is resting on a background surface, the game just draws the foreground tile, relying on the surrounding unoccupied background tiles to indicate what the object is standing on. Characters cannot overlap in most vintage character graphics systems.
Allowing graphics objects to overlap is the primary purpose of the VIC-II’s hardware sprites. Sprites can appear “in front of” or “behind” characters, and can be positioned at any pixel coordinate. The video chip composes the scene as it draws the screen, calculating the color of each pixel based on characters in screen memory and sprites described in registers. The VIC-II needs to handle sprites in a special way, so it can only support eight of them at a time. As we’ve seen, if the program jiggles the sprite registers fast enough, it can get the VIC to draw more than eight sprites on the same screen, with some limitations.
But this won’t do for my strategy game, which I’m calling Tactical Strike. I want vehicles to roll over flowers, just like in the dramatic openings of war movies. I want boats in the water, and helicopters over everything. And I have user interface elements such as unit counters and movement arrows. I can’t use VIC-II sprites for this. How can I draw characters on top of other characters?
NCM hot topics
Tactical Strike uses Nibble Character Mode (NCM) for its tiles. We got an NCM example working in the last Digest, but we left out a few important topics to focus the discussion. Let’s clear those up now.
Hot registers
You can think of the MEGA65’s VIC-IV as a superset of the VIC-II and VIC-III. While the VIC-III did introduce new features above the VIC-II, it retained nearly all of the behaviors of the original VIC-II registers for backwards compatibility. With the VIC-IV, we wanted to go a bit further, including enhancing some features of VIC-II registers. This poses an interesting conundrum: how can the VIC-IV expand an existing VIC-II feature, while still allowing the VIC-II registers to retain their original behavior?
A notable example: We’ve been playing with the VIC-IV CHARPTR register, which tells the VIC the precise address where in memory to find the character set. The VIC-II also has a way to relocate the character set, but it works differently, using a combination of banking bits on the 2nd CIA chip and four bits at address $D018 (register CB) to select a region on a 1 KB boundary. On the MEGA65, when a program updates these C64-style registers that change the character set location, the VIC-IV calculates the equivalent address and updates CHARPTR automatically.
$D018 is one of five VIC-II register addresses that behave this way. The others are $D011, $D016, $D031, and the VIC-II bank bits of $DD00 (CIA 2 PORT A). These are the hot registers.
That’s nice if that’s all the VIC-IV did, but there’s a catch. If the program writes to any hot register, all of the hot registers propagate to their VIC-IV equivalents, not just the one register that was updated. This can sometimes cause unintended behavior.
Hopefully nobody noticed, but there was a hot register hazard in a previous Digest. We did an experiment involving Low-res Multicolor Mode (MCM), and another experiment involving updating CHARPTR. The MCM register is bit 4 of address $D016, a hot register. If you set CHARPTR to a custom address, then activate MCM, you may be surprised to see CHARPTR get reset to the equivalent of the VIC-II registers as the hot registers propagate.
The easiest way to prevent confusion is to disable the VIC-IV hot register behavior. To do this, clear the HOTREG register, bit 7 of address $D05D.
CLRBIT $D05D,7
This is sufficient for most programs that know how to use the VIC-IV. In exchange, you have to know which VIC-II registers no longer propagate.
See the “Hot Registers” section of the VIC-IV appendix in the Compendium for a complete explanation.
Correcting for a VIC-III pixel offset bug
The H640 register, bit 7 of $D031, selects the horizontal resolution of the screen: 320 pixels (40 text columns) or 640 pixels (80 text columns). The original Commodore 65 VIC-III has a bug where characters are drawn shifted slightly to the left in H640 mode. To compensate, manipulating the H640 register also sets the VIC-II horizontal scrolling register, known as XSCL at $D016.0-2. The MEGA65 implementation reproduces this bug and the compensation for compatibility reasons, which means programs have to work around it. (We’ll cover text scrolling another time. For now, just know that there are registers that can nudge the screen horizontally by a number of pixels. Try messing with them!)
$D016 is a hot register. The VIC-IV has a more powerful horizontal scrolling register called TEXTXPOS ($D04C), and with hot registers enabled, a hot register update propagates XSCL to TEXTXPOS. In the full sequence of events, changing H640 sets XSCL to 1, which results in a TEXTXPOS of either 2 pixels for 80-column mode or 1 pixel for 40-column mode.
In most cases, the easiest way to account for this is to disable HOTREG, set H640 as desired, then reset TEXTXPOS to its proper default of 80 pixels. With HOTREG disabled, the program has full control over the VIC-IV text position, and doesn’t have to account for the VIC-III bug or its compensation.
CLRBIT $D05D,7 : REM Disable hot registers.
CLRBIT $D031,7 : REM Select 40-column mode.
POKE $D04C,80  : REM Reset TEXTXPOS to the standard 80 real pixels.
There are other ways around this for unusual cases where you might want to keep HOTREG enabled or use VIC-II registers. If you think you have such a case, ask about it in the Discord.
Disabling character attributes
As you may recall, VIC-III character attributes add effects to text characters using the upper four bits of color memory: blink (bit 4), reverse (bit 5), bold (bit 6), and underline (bit 7). Low-res Multicolor Mode (MCM) disables these automatically to use those bits for another purpose, but the other modes keep them available.
This includes the Super-Extended Attribute Modes. We were able to ignore this in our demonstrations of Full Color Mode (FCM), because color memory only stores the highest-value color for each character ($FF) and we left this unused and set to zero. You can, in fact, use the four text attributes in Full Color Mode by setting the appropriate bits of the high byte of color memory.
In Nibble Color Mode, the four attribute bits serve a dual purpose—and we pretty much never want them to. When NCM is enabled for a character (bit 3 of the low byte of color memory), bits 4 through 7 of the high byte of color memory select one of the 16 sub-palettes used by the nibble values of the character. By default, these bits also enable text effects.
Thankfully, the VIC-III has a system-wide switch to disable text effects: the ATTR register, $D031 bit 5. Clearing this bit suppresses the text effects, so these bits can be used exclusively for sub-palette selection in Nibble Color Mode.
CLRBIT $D031,5
CHRCOUNT and LINESTEP
Recall that the LINESTEP register ($D058-$D059) tells the VIC how much screen and color memory is used for each character row. In normal text mode, an 80-column text screen uses 80 bytes of screen memory per row, one byte per character, so LINESTEP is 80. Enabling CHR16 doubles the amount of screen memory per character, so an 80-column screen needs a LINESTEP of 160.
There’s another register that tells the VIC how many characters are on each row. The CHRCOUNT register is 10 bits, with the lower 8 bits at $D05E, and the upper 2 bits at $D063.4-5. When the VIC draws a row, it counts the characters it is drawing left to right, then stops drawing once it sees CHRCOUNT characters.
You can have more memory reserved per row by LINESTEP than is needed for CHRCOUNT characters—and we’ll see a reason why later in this article. You cannot have a CHRCOUNT higher than the amount of memory reserved by LINESTEP; this causes the VIC to overrun each line’s memory. (I mean, you can do this if you’re designing some oddball special effect. Don’t let some bossy newsletter stop you.)
We didn’t need to address CHRCOUNT in previous experiments because we kept it at the default of 80, and always used a LINESTEP of either 80 with CHR16 disabled, or 160 with CHR16 enabled, so there was always enough memory for all 80 characters.
Tactical Strike screen settings

Here’s the full set-up sequence for drawing the Tactical Strike tile set on the screen, using a resolution of 320 x 200 (H640=0), SEAM enabled, and 20 NCM characters per row:
100 CLRBIT $D05D,7 : REM Disable HOTREG
110 POKE $D04C,80  : REM Ensure TEXTXPOS is 80
120 CLRBIT $D031,5 : REM Disable ATTR
130 CLRBIT $D031,7 : REM Select 40-column mode (H640=0)
140 SETBIT $D054,0 : REM Enable SEAM (CHR16)
150 SETBIT $D054,2 : REM Enable FCLRHI
160 WPOKE $D058,40 : REM LINESTEP = 20 x 2
170 POKE $D05E,20  : REM CHRCOUNT = 20
180 WPOKE $D060,$0000 : WPOKE $D062,$05 : REM SCRNPTR = $5.0000
For this simple demonstration of the tile set, the entire screen is filled with NCM characters. Each character is 16 pixels wide, and on a 320 x 200 display, that allows for 20 NCM characters per row. I can set CHRCOUNT to 20 and LINESTEP to 20 x 2 = 40 (two bytes per character), for a total of 25 rows = 40 x 25 = 1,000 bytes of screen and color memory. (Each tile is two rows tall, so I have a tile grid of 20 x 12, with one spare row.)

For an actual game, I’d probably declare some rows as the tile-based game board, and use other rows for 40-column text. Recall that FCLRLO and FCLRHI control which screen memory values refer to the character set indexes (screen codes) vs. FCM/NCM character addresses. By leaving FCLRLO clear, I can use the first 256 screen memory values to refer to the character set, either the default PETSCII set or a custom set that I can define in the usual ways.
If I am going to use 40-column text for some rows, then I need to set LINESTEP and CHRCOUNT accordingly. The easiest thing to do is establish 40 characters per row, and just let the extra screen memory on the 20-character tile rows go unused.

Tactical Strike tiles and colors
Tile set data will live at $4.0000. As we did last time, I have tile set and palette data in data files that I BLOAD into appropriate memory locations. We can’t BLOAD directly into palette registers, so I stash palette data temporarily then copy it in with a loop.
190 BACKGROUND 1:BORDER 0
200 BLOAD "MPDATA.DAT,S",R,P($40000) : REM Load char data
210 BLOAD "MPPAL.DAT,S",R,P($1E000) : REM Load palette data
220 FOR I=0 TO 767:POKE $D100+I,PEEK($1E000+I):NEXT
Recall that we don’t need to set CHARPTR for FCM/NCM characters: the screen memory value is an address, not a screen code. Specifically, the address is 64-byte aligned and divided by 64, so with NCM characters stored at $4.0000, the screen memory values are the tile character number plus $1000. Color #1 is the color of grass, so I set that to be the background color for now.
I used my own Python script to convert the tile set from a PNG file to NCM character set data, and did some planning around the palette. Recall that each NCM character can only use one of sixteen sub-palettes of fifteen colors each plus the background color (value $0). The character’s color memory value selects the sub-palette used by the character, and also sets which color in this sub-palette is used if the character pixel is color 15 (hexadecimal $F).
This makes it possible to reuse tile definitions with different sets of colors. This could come in handy for Tactical Strike! The tileset has tiles for five “teams,” each with the same set of vehicles, soldiers, and buildings drawn with different palettes. I only really need one set of vehicles et cetera for all five teams, and one sub-palette per team.
For this demonstration, I wasn’t so clever. The original Kenney tile set uses a total of 36 palette entries, and (luckily) each tile uses fewer than 15 colors from this palette. I organized the tile set into groups that could share sub-palettes, and left it at that. I ended up with 14 tile groups, each using a sub-palette. The tiles don’t use the $F foreground color. I don’t necessarily recommend this approach, this was just the easiest thing to do given that the tile set was not drawn specifically for the MEGA65.
In my code, the TP() array stores the sub-palette ID (0 to 13) for each of the 198 tiles, which I prepare as 26 tiles using sub-palette 0, 18 tiles using sub-palette 1, and so on. This is based entirely on decisions I made in the Python script. When I draw a tile, I will select the tile’s color memory value from this array.
230 DIM TP(198):Y=0
240 FOR P=0 TO 13:READ V
250 FOR I=0 TO V:TP(I+Y)=P:NEXT I
260 Y=Y+V
270 NEXT P
280 DATA 26,18,21,18,10,10,10,10,10,13,13,13,13,13
Drawing Tactical Strike tiles
We’re ready to draw some tiles on our grass-green field. Each tile is two NCM characters stacked vertically, and I made sure that both characters were next to each other in the character set data. To draw the first tile (tile #0), we would draw character #0 on the first row and character #1 on the second row, setting the color memory for each to TP(0).
The following loop draws all 198 tiles in order, in rows left to right, top to bottom. The subroutine at line 1000 draws tile T at tile position (X,Y). Remember that each SEAM character uses two bytes of both screen and color memory; 20 tiles (CHRCOUNT=20) require 40 bytes (LINESTEP=40). Read the subroutine carefully and try to figure out what each number represents.
290 FOR T=0 to 197
300 Y=INT(T/20):X=MOD(T,20)
310 GOSUB 1000
320 NEXT T

325 REM Fill the rest with tile 0.
330 FOR P=198 TO 239
340 Y=INT(P/20):X=MOD(P,20):T=0
350 GOSUB 1000
360 NEXT P

999 GOTO 999

1000 O = Y*40*2 + X*2
1010 WPOKE $50000+O,$1000+T*2
1020 WPOKE $50000+O+40,$1000+T*2+1
1030 POKE $FF80000+O,8 : REM NCM bit
1040 POKE $FF80000+O+1,TP(T)*16 : REM Sub-palette for tile
1050 POKE $FF80000+O+40,8
1060 POKE $FF80000+O+40+1,TP(T)*16
1070 RETURN
This is enough to draw any tile at any position on the 20 x 12 grid. We could use this to draw a terrain map for the battle. We could also draw foreground tiles Ultima-style, with foreground replacing background, using the same subroutine. But we can do better.
Introducing the Raster Rewrite Buffer
It’s time to pull back the curtain on the final major component of VIC-IV character graphics!
We’re used to thinking of character graphics as a single field of character tiles arranged in a grid. The contents of screen memory describes which character in a character set appears at each grid location, arranged in memory as consecutive rows of equal length. As the raster beam marches down the screen, the VIC considers one row at a time, figuring out what color to set each pixel based on the screen code, the corresponding pixel data in the character set, and color memory. After the eighth line, the VIC moves on to the next row in screen and color memory.
In normal text modes, it’s easy to imagine that the VIC sees in screen memory roughly what we see on the screen, arranged in a grid. When we introduced NCM characters, we got a hint that the VIC might be doing more than we think: each NCM character is 16 pixels wide instead of 8, and you can mix 16-wide NCM characters with 8-wide characters on the same row. The VIC isn’t just looking at 40 bytes for 40 characters in a row. It’s looking at CHRCOUNT characters at a time, and figuring out from each character on the row how to draw the line. Each character may have a different width, pushing the horizontal draw position a different amount for each character.
You can think of the screen and color memory bytes as instructions that the VIC is following to draw the line: get character data from here, color data from there, use that to paint each pixel, then advance to the right by a certain amount. The VIC performs these instructions in order for the current row, and draws its calculated results into a raster buffer. When it reaches the end of the row’s character count, the VIC feeds the raster buffer to the raster beam to draw the final image.

So, how do we draw a soldier standing on a flower tile? We give the VIC a different kind of instruction! So far we’ve only seen screen and color values that describe a character to draw. You can also spend a character’s worth of screen and color memory to tell the VIC to change its state for drawing subsequent characters on the row. This non-character instruction identifies itself by setting a reserved bit of its SEAM color memory. When this bit is set, all 32 bits of screen and color memory for the non-character instruction tell the VIC what to do next.
One of several things this non-character can tell the VIC to do is to change the horizontal position of where characters are drawn in the raster buffer. This feature is so cool that the reserved bit is named after it: the GOTOX flag. Because GOTOX can tell the VIC to go back and re-draw previous pixels on a line, the raster buffer is also known as the Raster Rewrite Buffer (RRB).
Here’s a way we can tell the VIC to draw a soldier tile on top of a flower terrain tile, in three character instructions:
- Draw the NCM character for the flower terrain tile.
- GOTOX: set the buffer write position back to the left edge of the flower terrain tile, and treat color $0 as transparent in subsequent characters.
- Draw the NCM character for the soldier tile.

When the $0 pixels in the soldier tile are treated as transparent, they do not change the buffer contents. The flower tile appears “below” the soldier.
GOTOX, horizontal draw position, and transparency
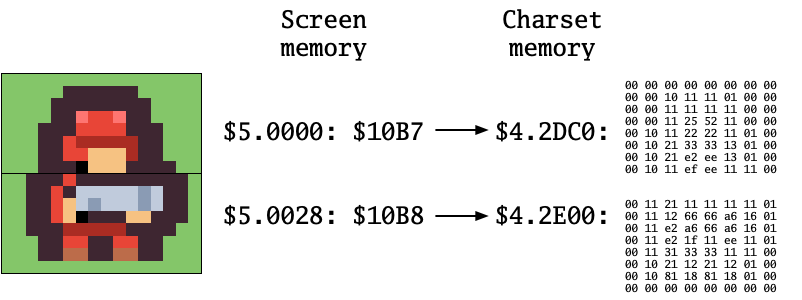
Let’s see this in action. We will draw the flower terrain tile (tile #1) in the upper left corner. This will be followed by a GOTOX non-character instruction, then the red soldier tile (tile #183).
We already know how to draw the NCM characters for instruction #1 and #3. For these characters, the GOTOX bit is clear, and the NCM bit (color memory byte 0 bit 3) is set.
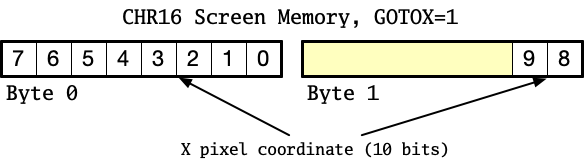
The GOTOX flag is color byte 0 bit 4. Setting this bit says this is a GOTOX instruction, not a character. The VIC does not draw a character for this instruction, even though the instruction occupies two bytes of screen memory and two bytes of color memory. All of the other bits in screen and color memory for a GOTOX instruction have new meaning.

The horizontal position is a pixel coordinate, from the left border. This is a 10-bit value: screen byte 0 is the lower eight bits, and bits 0 and 1 of screen memory byte 1 are the two high bits.
For this demonstration, we’re keeping tiles aligned with the tile grid, but we could easily use this horizontal pixel coordinate for more precise placement on the screen, or smooth movement animations. (And yes, there is a way to offset the draw position vertically. We’ll cover that in another Digest.)
The last GOTOX property we’ll look at here is the transparency bit, color byte 0 bit 7. When set, this causes subsequent characters to not draw anything for pixels of color $0, allowing whatever was previously written into the buffer to shine through. When transparency is off, the screen background color is drawn for these pixels. Remember that this setting remains enabled for all subsequent characters on the row, or until it is changed by another GOTOX instruction.
This code draws the solider on the flowers. (Note that CHRCOUNT and LINESTEP are not set correctly in this case: the GOTOX instruction is eating one of the 20 character slots! We’ll discuss this in a moment.)
290 REM Fill the tile 0.
300 FOR P=0 TO 239
310 Y=INT(P/20):X=MOD(P,20):T=0
320 GOSUB 1000
330 NEXT P

340 REM FLOWERS
350 WPOKE $50000,$1004
360 WPOKE $50028,$1005
370 WPOKE $FF80000,$0008
380 WPOKE $FF80028,$0008

390 REM GOTOX
400 WPOKE $50002,$0000
410 WPOKE $5002A,$0000
420 WPOKE $FF80002,$0090
430 WPOKE $FF8002A,$0090

440 REM RED SOLDIER
450 WPOKE $50004,$116E
460 WPOKE $5002C,$116F
470 WPOKE $FF80004,$C008
480 WPOKE $FF8002C,$C008
GOTOX and layers

This simple example implies one way to draw the Tactical Strike playfield with background and foreground tiles: for each position, draw the entire stack of desired tiles, with a GOTOX to rewind back one tile position between each tile in the stack.

This produces the result that we want, but has some disadvantages. For starters, this method is difficult for the program to manage. Tactical Strike will keep the background mostly the same, then move foreground objects around on the field. With GOTOX instructions scattered throughout, the program would have to recalculate the entire row for simple changes.
Another method is to define a number of layers, allocate enough characters for each layer to span the entire playfield, then insert a GOTOX instruction between each layer (on each row) to reset the X position to 0 and enable transparency. The background fills the bottommost (first) layer, and other layers are filled with empty spaces and foreground objects.
This is much easier on the program code: it can locate the memory for any tile at any position on any layer using simple math. In exchange, it uses a bunch of memory on empty spaces. Many games are similar to Tactical Strike in this way: the background layer is full, but foreground layers are sparse.
For Tactical Strike specifically, I might go with a hybrid approach: for each row, draw the entire background, then follow it with a “draw list” of GOTOX instructions and tile characters. The program has to re-calculate the draw list on each row when stuff changes, but it can leave the large background layer alone, and locate each draw list with a simple multiplication.

Allocating memory with CHRCOUNT and LINESTEP
To draw all of the tiles in a single layer 20 tiles across, I set CHRCOUNT to 20, and LINESTEP to 40 bytes = 2 bytes per tile for each of screen and color memory. Non-character instructions consume screen and color memory just like characters, and we’re piling more characters onto the row in layers, which also need more memory. I need to increase both CHRCOUNT and LINESTEP to account for all of these bytes, up to the maximum I expect to need for any given row.
Say we have 20 tiles across, 12 tiles down, and 3 layers = 720 tile positions. Each row needs two bytes of screen memory per tile and per GOTOX instruction, and this would use two GOTOX instructions in addition to sixty tiles, for a total LINESTEP of 20 x 3 x 2 + 2 x 2 = 124. Each tile is two character rows, for a total of 2,976 bytes of screen memory and 2,976 bytes of color memory for the entire display.
What about CHRCOUNT? CHRCOUNT must be at least the maximum number of characters and non-character GOTOX instructions in a row. 20 characters per layer plus one GOTOX instruction between each of three layers is 62 characters, so CHRCOUNT is 62.
For SEAM graphics modes where each such character takes two bytes of screen memory, LINESTEP is twice as much as CHRCOUNT. Once again, we can ask: why is LINESTEP a register, and not calculated automatically from CHRCOUNT and CHR16? This is so the program can request a LINESTEP that makes addresses easier to calculate. For example, with our CHRCOUNT of 62, LINESTEP must be at least 124, but setting LINESTEP to 128 (and wasting a few bytes of memory per row) would allow each row to start at an address that’s a multiple of a large power of two: $5.0000, $5.0080, $5.0100, $5.0180, etc. This makes character addresses faster to calculate, especially in assembly language.
In general:
maximum characters + GOTOX per row = CHRCOUNT <= LINESTEP/2
I can minimize the amount of memory required for each row by designing my program carefully. The Tactical Strike playfield might be 20 tiles across, but if I limit the number of foreground objects and layered icons, I don’t need to allocate a full 20 tiles for each possible layer. The draw list method can be made to use less memory than the full-size layer method.
RRB cycle cost and “double buffering”
Why are we worrying so much about memory? CHRCOUNT is a 10-bit register, so there’s a logical maximum of 1,024 characters and GOTOX instructions on a row. That seems like plenty. But there’s another limit we need to consider. The VIC only has so much time during which it can mess with the Raster Rewrite Buffer before it has to start drawing to the screen. This limit is influenced by a couple of factors.
The RRB has the option to use what the MEGA65 documentation calls “double buffering.” This isn’t double buffering in the sense of full animation frames, it just means that the VIC will prepare the buffer for a later line while an earlier line is being drawn to the screen. You can disable this if you’re doing something fancy, but in most cases it is sensible to leave it enabled. The register NORRDEL, $D051.7, should be clear to keep double buffering enabled.
181 CLRBIT $D051,7
If you’re using the lower vertical resolution of 200 pixels (as I am), you can double the amount of RRB mess-around time, in four steps:
- Set V400, $D031.3. Normally this enables a vertical resolution of 400 pixels, but we’re about to reverse this effect.
- Set CHRYSCL $D05B to 0. This scales text vertically back to size.
- Set the DBLRR register bit, $D051.6. This tells the VIC to spend twice as much time drawing into the RRB, drawing half as many lines. This brings the V400 resolution back down to 200 lines, and gets us the extra RRB time we need.
- Shift the start of text rendering up by two pixels: set TEXTYPOS $D04E to 102. With the extra draw time, the RRB needs text rendering to start underneath the top border, so it’s ready with the first line when the raster reaches the drawing area. I notice that with DBLRR enabled, TEXTYPOS must be an even number.
182 SETBIT $D031,3
183 POKE $D05B,0
184 SETBIT $D051,6
185 POKE $D04E,102
There have been multiple discussions in the MEGA65 Discord about how to measure and maximize RRB use—and work around bugs or unexpected behaviors. The most general advice is to experiment: figure out early what you want your program to do, then write short programs to determine what you can get away with.
I did a brief test of the full-layer method using twelve rows of twenty NCM characters. I allocated a number of layers with CHRCOUNT and LINESTEP, then filled each layer with random tiles, one at a time. It handled 11 such layers without difficulty. Starting at 12 layers, my display started missing lines it didn’t have enough time to finish drawing. I would expect different results using FCM characters, or other modes or screen resolutions.
A quick word about Xemu
Important note: You will see different edge case behaviors on a real MEGA65 vs. the Xemu emulator, so be sure to run your experiments on both. Xemu handled 12 layers fine, and saw a different failure mode at 13. With all of the above settings, I get almost identical behavior on both real hardware and Xemu.
If you’re in a jam trying to get things to look right on both platforms, there’s no shame in reading the REALHW register at $D60F.5, which is set to 1 on a real MEGA65 and 0 on Xemu, then changing settings accordingly. For example, you might want to tweak the top and bottom border positions, $D048 and $D04A respectively, based on which platform is running. I’ve noticed a one pixel difference between them in my tests.
End every row beyond the right border
There’s an important caveat when using GOTOX to position foreground objects on a playfield.
When it’s time for the VIC to draw the raster buffer to the screen, it assumes that the last horizontal draw position it encounters is the end of the line. With the draw list method, the last character drawn might be somewhere in the middle of the screen. If we do nothing else, the VIC will assume that’s the right-hand border—and decline to copy the rest of the buffer to the screen. None of the characters at any layer will appear to the right of this position.
The solution is to end the draw list with a GOTOX to the right border. Also, MEGA65 developers discovered that the GOTOX must be followed by a character for this to work consistently in both the MEGA65 and the Xemu emulator. Note that the program still has to fill the unused memory on a row with dummy characters when it calculates the draw list, otherwise a leftover GOTOX instruction might mess everything up.

That’s a good start! We now know enough to draw characters on top of other characters, which makes possible all kinds of graphics techniques. A simple version of Tactical Strike sticks to the character grid, but with pixel positioning and GOTOX, clearly more is possible. There’s more to explore!
Tactical Strike also benefits from being a turn-based strategy game, so we could probably finish a pretty fun game written entirely in BASIC. Larger or faster games may need to be built in assembly language for speed. Eventually, we may need to tap in another MEGA65 feature we haven’t discussed in the Digest yet: the DMA.
Thanks to everyone for your patience on the Digest release schedule. I’ll try to get this thing back on the monthly cadence, or at least come up with a new regular schedule so everyone knows what to expect.
See you next time, and happy coding!
— Dan