Sounds of the SID
Sounds of the SID. Dan’s MEGA65 Digest for November 2022.
[Did you know: All issues of the Digest have an audio version! Search for “Dan’s MEGA65 Digest” in your favorite podcast app, or check out the audio player at the top of each issue. — Dan]
The Commodore 64’s Sound Interface Device (SID) chip was ahead of its time. While other personal computers were limited to simple beeps, the SID provided features comparable to professional sound synthesizers, with support for multiple kinds of sound waveforms, three-voice polyphony, and advanced filters and effects. Musician-programmers and game developers pushed the SID’s capabilities to the extreme, finding clever ways to drive the chip to produce multi-instrumental arrangements. To this day, artists continue to contribute to a vast legacy of SID-based music.
The MEGA65’s audio subsystem includes four SID chips, alongside more modern sound capabilities. In this Digest, we will scratch the surface of how the SID works, and how to produce sound and music with the SIDs from BASIC. We’ll also introduce a new music demo written for the MEGA65 that takes full advantage of all four SID chips. MEGA65 music is a big subject, and we’ll cover more music topics in future issues of the Digest.
But first, some news!
New firmware release
The new release bundle for the firmware and system software has completed testing and is now officially declared “stable.” The new batch of MEGA65 computers being delivered by the end of the year 2022 will have this release installed at the factory. Anyone who received their MEGA65 computer earlier this year is encouraged to upgrade.
Release bundles now have version numbers to make them easier to understand. The new release is known as release v0.95, and includes the MEGA65 core dated October 2022 (20221012.18,93d55f0) and MEGA65 ROM 920377. The previous release has been retroactively labeled v0.9.
I have updated the MEGA65 Welcome Guide to describe the upgrade procedure, and to welcome the new batch of owners. You can download the release v0.95 bundle from Filehost. Sign in with your account, make sure you have redeemed your owner code, then download the release package:
- MEGA65 Core Release Package (mega65r3) incl. ROM (only accessible if you’re signed in)
If you have any questions about upgrading, ask for help in the Discord!
Real-Time Clock replacement program
The MEGA65 has a built-in Real-Time Clock (RTC) chip that keeps track of the date and time. If you haven’t yet, you’ll want to open your MEGA65 case and install a battery of type CR1220 on the main board. See the Welcome Guide for instructions with photos.
It was discovered earlier this year that a minority of MEGA65 computers contained faulty RTC chips, estimated to affect about 20% of computers. Faulty RTCs count the seconds too slowly or not at all. Starting with release v0.95 of the system software, the Freeze menu includes a diagnostic utility that knows how to test for a faulty RTC. (Open the Freeze menu and press the Help key to start it.)
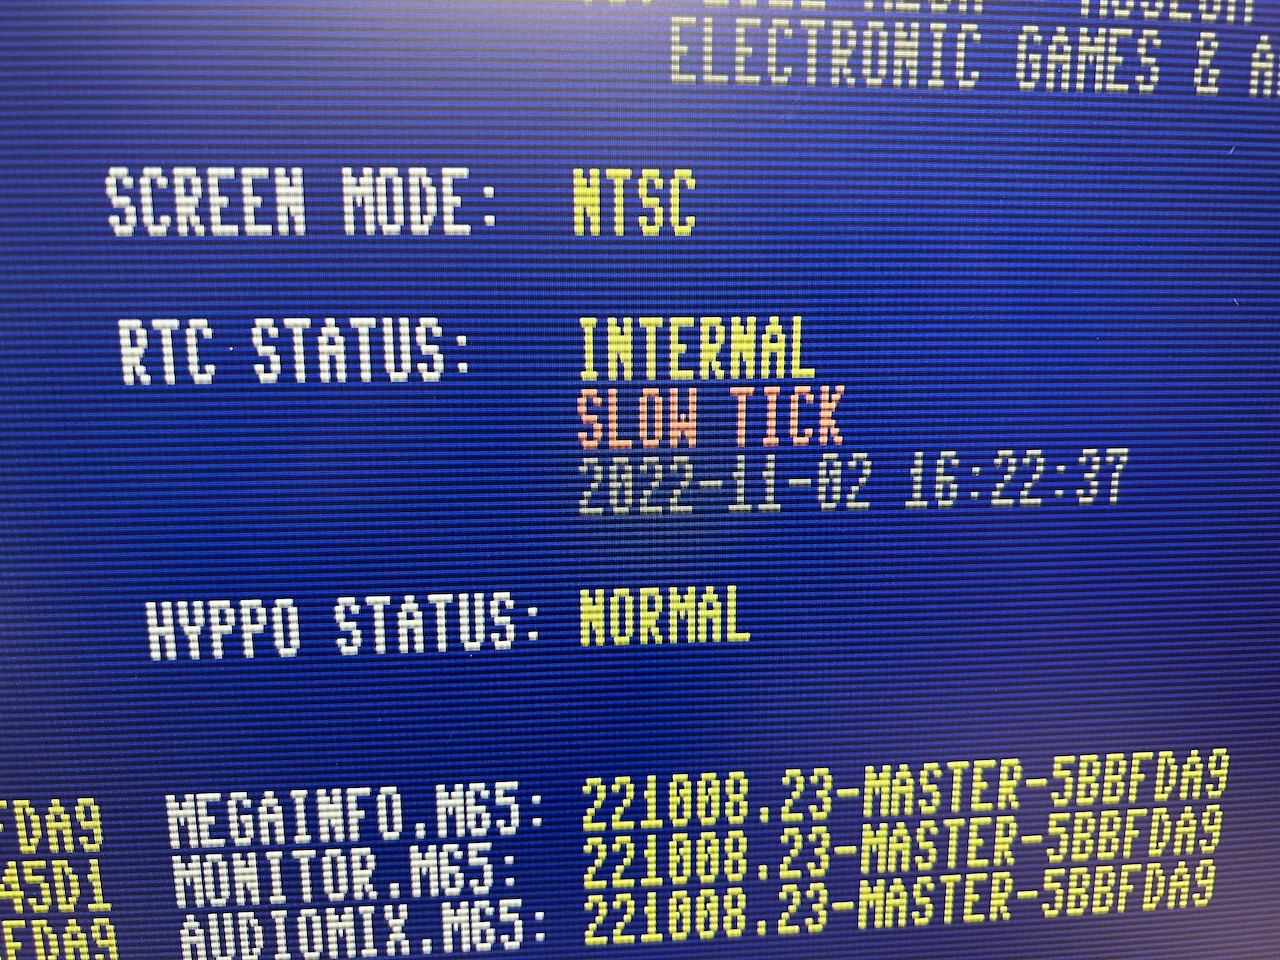
The MegaInfo utility detecting a slow-ticking internal RTC.
If your MEGA65 has a slow or stopped clock, you can request a replacement part that connects to the main board. For instructions on how to run the diagnostic utility, and how to request a replacement unit, see this article on Filehost:
Thanks to the generosity of the MEGA65 community, we are able to offer this replacement part for the cost of shipping. Make sure your RTC fails the test with a fresh battery before requesting the part. We will send you email with the cost of shipping to your location after you submit a request, and you can cancel your request without remitting payment. Currently, shipping from the USA to Europe is $18 USD. We will try to find the cheapest shipping option to your location. We only accept PayPal at this time. [Update December 2022: Previously we covered shipping costs through donations. Donations have since been exhausted. Thanks to everyone who contributed!]
I am personally assembling these replacement parts in my basement! Many thanks to the MEGA65 team and community donors for making this fix possible.
C64 core release 4
The MEGA65 is not just a MEGA65. Thanks to its FPGA-based architecture, it can be reconfigured to behave like other computers. By far the most thorough transformation available today is the Commodore 64 core by MJoergen and sy2002, based on the MiSTer core. This core provides a PAL-mode C64 experience with a high degree of compatibility, and has been tested thoroughly with even the most intense games and demos. The “C64 for MEGA65” earns its place in slot 2 of everyone’s computers.
They’ve just announced a new release 4 of the C64 core, which adds RAM Expansion Unit emulation and writable D64 disk images. Many aspects of the core can be configured, especially display settings, and starting with this release you can save your settings to the SD card.
Download the C64 core from Filehost and install it from the core selection menu, similar to how you upgraded the MEGA65 firmware.
The sound of ones and zeroes
The simplest way for a computer to make sound is to send ones and zeroes to a speaker. A “one” pushes the diaphragm of the speaker all the way out; a “zero” pulls it all the way in. If the computer sends alternating ones and zeroes fast enough, we perceive the pressure wave generated by the diaphragm as sound.

The faster the computer alternates the ones and zeroes, the higher the pitch of the sound we perceive. The slower the alternations, the lower the pitch. We can describe the pitch of the sound in terms of the frequency of the repetitions, expressed as the number of repetitions per second, or Hertz (Hz). A frequency of 880 Hz is higher in pitch than a frequency of 660 Hz.

The more forcefully the computer pushes the diaphragm of the speaker, the louder the sound. This is known as the amplitude of the wave, or the volume of the sound. The computers sending ones and zeros to a speaker are beeping as loud as they can: the difference between the “one” and the “zero” is as much as it can push the speaker. If you’re lucky, such a computer has a volume knob connected that reduces the amplitude of the signal electronically before it reaches the speaker.

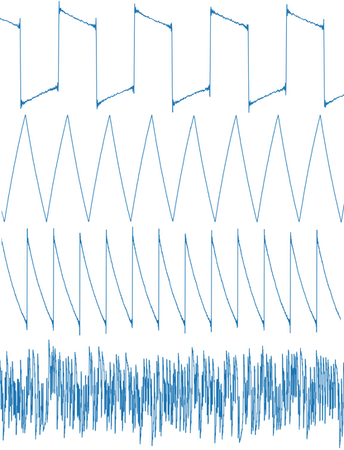
With only ones and zeroes at its disposal, it might seem like this simple computer can only make one kind of sound at different pitches, or no sound at all. In fact, it can change the nature of the sound in one other way. When it sends a “one” for a small fraction of a second then sends a “zero” for that same amount of time, and repeats this pattern at a given frequency, the computer generates a special kind of pulse wave known as a “square wave.” The computer can also differ how long it holds the “one” relative to the “zero,” known as the pulse width. The pulse width affects the timbre of the sound, a musical term referring to the nature of the tone independent of its frequency or amplitude.

It’s worth pausing here to admire what creative coders have done with these simple pulse waveforms. By rapidly adjusting the frequency and width of these pulses in complex patterns, computers can generate music that sounds, at least to a generous observer, like a band of instruments playing a tune.
Introducing the SID
Pulses are a crude digital way to make noise. By the time of personal computers, musicians had already spent decades developing sophisticated analog sound synthesis techniques. To break free of pulse waves, computers needed analog devices that they could control digitally, entire chips dedicated to sound and music.
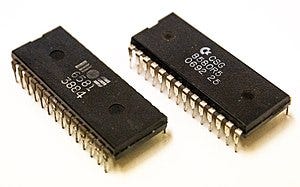
Commodore’s solution was the MOS 6581 Sound Interface Device, now known the world over as simply “the SID chip.” The SID brought sound synthesis features previously found only in professional musical instruments to home computing, and became a defining characteristic of Commodore computers. For later models of the C128 and C64C, Commodore used an improved version with the part number 8580 with minor differences from the 6581. Audiophiles are divided as to which version sounds best. SID designer Bob Yannes went on to found the Ensoniq synthesizer company with an expanded version of the SID in its instruments.
The SID can generate four distinct types of sound wave: pulse waves of multiple pulse widths, triangle waves, sawtooth waves, and a randomized “noise” waveform. A single SID chip has three independent signal generators, capable of three simultaneous “voices” with separate wave and volume controls that can be combined for effects or used as separate instruments. (The 8580 can even merge the waveform types, but this is seldom used.)
The SID can trigger tones programmed with a volume pattern known as an “envelope” that can reproduce behaviors of musical instruments and other sound sources, such as a bowed violin or a plucked guitar. The signal generators can be synchronized and modulated with each other, and the combined output can be filtered by frequency.
The SID made the Commodore 64 popular with musicians, and composers produced a long legacy of SID music for games and demos. Third-party hardware such as the SID Symphony cartridge gave the Commodore a second SID chip, and you can find many six-voice dual-SID compositions in the archives. Today, hobbyist-made devices to add a second SID chip to a C64 are widely available. The vintage SID chips themselves are getting increasingly difficult to find, though hobbyists have recreated them as FPGA-based devices that slot in to vintage and retro hardware.
The MEGA65’s audio subsystem includes four SIDs as part of its FPGA architecture, for a total of twelve independent voices. The MEGA65 produces stereo audio, and by default places SIDs 1 and 2 panned slightly to the right, and SIDs 3 and 4 slightly to the left. You can adjust the mix yourself from the Freeze menu: hold Restore for a second then release, then press the A key to select the audio mixer utility.
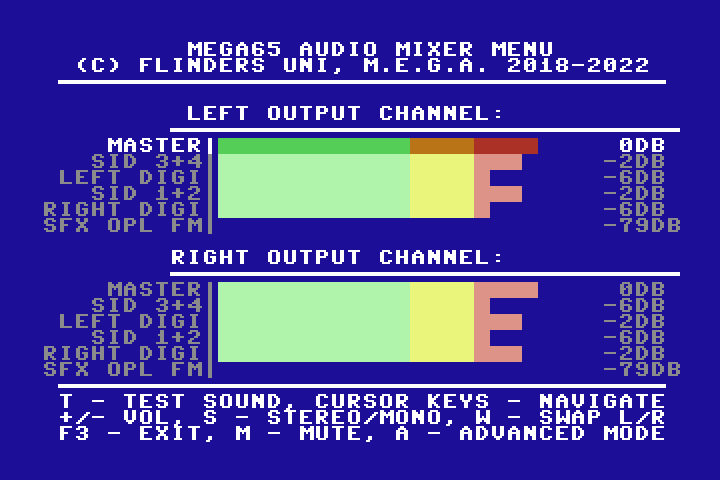
The MEGA65 also has separate hardware for playing 16-bit digitized audio samples, and room to add a Yamaha OPL FM synthesizer in a future firmware update. Altogether, MEGA65 audio represents multiple generations of microcomputer sound technology.
Sound and music with BASIC 65
MEGA65 BASIC makes it easy to include sound and music in your programs with simple commands. BASIC reserves two SID chips (six voices) for sound effects and the other two SIDs (the other six voices) for music, so effects and music never compete for resources.
All sound occurs simultaneously with the action of your program: the commands return control immediately, so your program can continue to drive animations and game logic while the music plays. This powerful feature is unlike any other BASIC, which, if they have sound commands at all, typically wait for the sound to finish playing before proceeding to the next command.
While these commands do not provide access to all of the features of the SID chips, they’re a quick and easy way to add sound and music to your BASIC programs.
The SOUND command
SOUND voice, frequency, duration,
  sweep-dir, sweep-lower-frequency, sweep-size,
  waveform, pulse-width
The SOUND command plays a single sound effect. When you provide the voice number (1-6), a frequency (in Hz), and a duration, it plays a square wave:
SOUND 1,3520,90
The duration is in a unit called a “jiffy.” The length of a jiffy depends on the MEGA65’s video mode: in PAL mode, it’s 1/50th of a second, and in NTSC mode it’s 1/60th of a second. (We’ll discuss this oddity a bit later.) So a duration of 90 in NTSC video mode would sound the tone for one and a half seconds.
The SOUND command can apply fun frequency sweeping effects, good for sirens, whoops, and rumbles. The sweep is described by three parameters. The first parameter is the direction of the sweep: 0 for up, 1 for down, and 2 to wobble up and down. Next is a second frequency lower than the first, defining a range that the sound will sweep between. The last sweep parameter is a duration of each repeat of the sweep. Larger numbers produce faster sweeps and more repetitions over the duration of the sound effect.
Experiment with these numbers to see what sounds you get.
SOUND 1,3520,90,0,2640,50
The command accepts additional parameters to select a different waveform or set the pulse width. If you want to use one or both of these parameters without a frequency sweep, provide empty values (just commas) for the sweep parameters.
For the waveform parameter, select 0 for a triangle wave, 1 for a sawtooth wave, 2 for a pulse wave, and 3 for noise. If you select the pulse wave (the default), you can set a pulse width in the range 0-4095.
Here’s a non-sweeping triangle wave:
SOUND 1,7040,90,,,,0
This produces low noise:
SOUND 1,880,90,,,,3
A noise waveform with frequency sweeping might sound like an airplane engine sputtering:
SOUND 1,4000,45,2,2000,900,3
Try the pulse waveform with different pulse widths to see how it affects the sound of a pulse wave:
SOUND 1,4000,45,2,2000,90,2,200
SOUND 1,4000,45,2,2000,90,2,800
SOUND 1,4000,45,2,2000,90,2,2500
The PLAY command
PLAY voice-1, voice-2, voice-3, voice-4, voice-5, voice-6
While you could generate musical melodies using a series of SOUND commands, this isn’t convenient. Instead, BASIC 65 has a featureful music system, and it’s based entirely on strings—strings of text, that is.
The PLAY command accepts up to six string parameters, one for each voice reserved for music. Each string describes a sequence of notes and directives to be performed by the voice. Sequences for separate voices are performed simultaneously, so you can generate harmonies and rhythms.
This command plays a simple melody using a piano-like sound:
PLAY "CEG"
These are the notes C, E, and G, played in sequence with a single voice. To play them simultaneously as a chord, we give one note to each voice in separate strings:
PLAY "C","E","G"
The directives and notes in a PLAY string are evaluated in order from left to right. A directive affects all subsequent notes played by the voice, until another directive changes the effect. For example, the O directive sets the octave with a number in the range 0-6:
PLAY "O3 CDEFGAB O4 CDEFGAB O5 C"
PLAY will ignore spaces in the string, so you can organize the symbols for clarity.
Each note is a letter in the diatonic C major scale: A, B, C, D, E, F, or G. The letter can be preceded by modifiers: the # symbol to make it sharp or the $ symbol to make it flat. For example, $B is B-flat. A note can also be the letter R to specify a rest.
PLAY "O4 RGG $BRRRGG $BRRRG$B O5 $ERDRCR CR O4 $B"
Duration and tempo
A note is a quarter note by default. You can precede it with a letter to set its length: W for whole note, H for half note, Q for quarter note, I for eighth note, and S for sixteenth note. Any of these followed by a dot (.) extends the duration by half: a dotted quarter note is the same duration as three eighth notes. For example, S#F is an F-sharp sixteenth note.
The note duration persists for the voice like a directive, so you only need to specify it once in a run of notes with similar durations.
PLAY "O4 S#F#G#F#G#F"
You can adjust the tempo for the entire song using the TEMPO command. Its sole parameter is a number in the range 1-255, where larger values are faster. You can think of this value in terms of beats per minute divided by ten: TEMPO 12 sets the tempo at 120 bpm. (The User’s Guide defines this value as the denominator in a fraction of seconds for a whole note, which breaks my brain.)
TEMPO 12
Instruments and envelopes
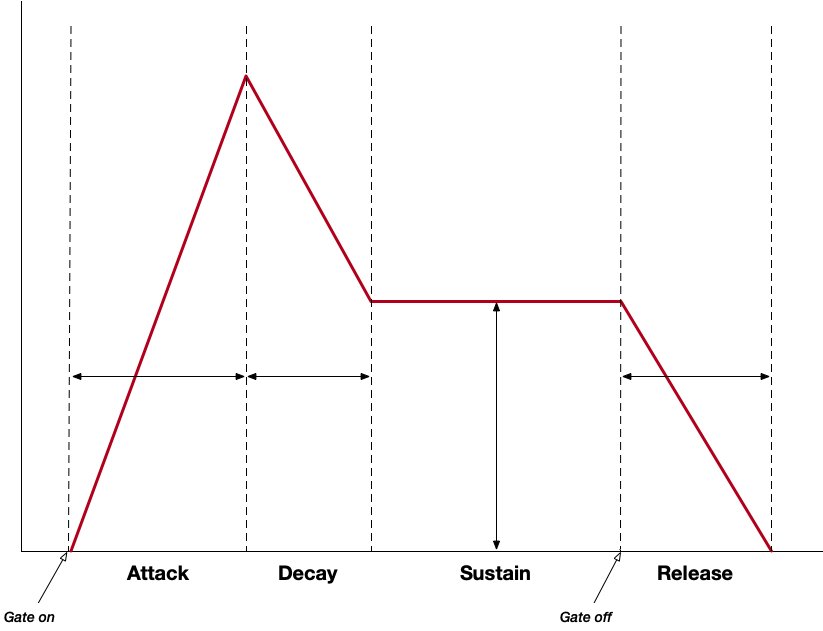
So far we’ve been playing a piano-like instrument. This is defined by a combination of the SID waveform type and an “envelope” that describes the volume curve for each note. The envelope consists of four segments, during which the volume increases (the attack), abates (the decay), holds (the sustain), then fades out (the release). This is what differentiates instrumental notes from the solid tones we produced with the SOUND command.
BASIC 65 starts with 10 default instrument envelopes, numbered from 0 to 9: piano, accordion, calliope, drum, flute, guitar, harpsichord, organ, trumpet, and xylophone. To change the instrument being used, issue the T directive followed by the number.
PLAY "T6 O4CECGCO5C"
PLAY "T8 O4CECGCO5C"
PLAY "T9 O4CECGCO5C"
Some of the instruments are more convincing than others, and may require some experimentation to fit your song.
You can overwrite any of the ten instrument slots with your own definition. See the ENVELOPE command in the User’s Guide for more information.
Looping, waiting, and silencing
The L directive tells the PLAY command to loop to the beginning of the string. This is great for background music that needs to play indefinitely. Remember to loop all voices for a piece of music in the same place—or loop them in different places for interesting effects! For instance, you can have a short loop for drums and a long loop for verses and choruses.
Issuing a new PLAY command with a new sequence for a voice that’s currently playing will stop the current sequence and start the new one. If you want a voice to continue playing while you issue a new sequence to a different voice, leave an empty parameter.
PLAY "CEGBGEL"  :rem  a loop for voice 1
PLAY ,"EDCDEGE" :rem  a sequence for voice 2, does not interrupt voice 1
If you want your program to wait until a PLAY sequence has completed, use the `RPLAY(n)`` function to test whether a voice is currently sounding. It takes the voice number as a parameter, and returns 1 if that voice is making sound, or 0 otherwise.
10 PLAY "O4CECGCO5C"
20 BORDER 0
30 IF RPLAY(1) THEN 30
40 BORDER 6
To silence all voices, issue the PLAY command without parameters. You will probably use this often when debugging games with background music, as the music will keep playing after the program halts with an error.
PLAY
Learning more about PLAY
When you first turned on your MEGA65, it loaded the demo disk menu with some jaunty background music. This menu is a BASIC program, and the music is produced by the PLAY command. Run the menu, exit to BASIC, then LIST the program to find the PLAY statements.
The User’s Guide describes a few more features of the PLAY command not covered here. The PLAY command can actuate the ring modulation feature of the SID, an effect that involves combining multiple voices in a complex way, so you’ll want to read more about that. PLAY can also enable and disable the filter on the SID; filter parameters can be set with the FILTER command.
Remember that PLAY sequences are BASIC strings. This means you can assemble and manipulate these strings as values before passing them as arguments to PLAY. This also means they are constrained by the BASIC limit of 255 characters per string. If you run out of string, you might consider breaking your composition into parts, and using RPLAY() to wait for each part to finish before PLAYing the next part.
The best way to learn is to experiment! Remember that you can always reset the computer and try again.
What’s PAL got to do with it?
Earlier, we said the SOUND command measures duration differently depending on which video mode your MEGA65 is in: PAL or NTSC. Why would the video mode have anything to do with playing sound?
Programs that play music are sensitive to timing. They need to execute code with strict regularity to make sure the music keeps up with the beat. Commodore games and demos typically tie their playback loops to another part of the architecture that keeps strict time: the video chip. Using raster interrupts, they set up their code to trigger each time the video chip refreshes the screen. The screen refreshes an exact number of times per second, so this is a good way to advance to the next step in a music composition with strict regularity. It’s like turning the cylinder of a music box at a steady pace.
There’s just one problem with tying playback to the video refresh rate: the PAL and NTSC video standards used different rates! Commodore made different versions of their computers for the analog video standards in the countries where they were sold, PAL in Europe and NTSC in the United States and Japan. (In countries that used a third standard called SECAM, Commodore sold PAL computers with video adapters.) PAL refreshed the screen at 50 Hz, and NTSC refreshed at 60 Hz. In many cases, games and demos written for one video standard played too slowly, too quickly, or not at all on a computer built for the other standard. It’s possible to write a program that works similarly for both, but this requires additional effort, and few people had both kinds of computers to test with.
The MEGA65 outputs a modern digital video signal that supports multiple refresh rates. For compatibility with older software, the MEGA65 continues to honor PAL and NTSC as separate video modes, including their raster timings. Many modern digital displays will honor both modes, but some of us have older displays that get confused by one or the other. You may or may not remember setting your default video mode when you turned on your MEGA65 for the first time.
You can check which mode you’re in, and change it, in the Freeze menu: hold Restore for a second then release, then locate the Video setting (PAL50 or NTSC60). Press the V key to switch between them. If a game or demo isn’t running correctly for you and your display supports both modes, try switching modes and running the program again.
PAL vs. NTSC survey!
Can the display you use with your MEGA65 support both PAL and NTSC video modes, or just one or the other? Developers want to know!
MEGA65 musician and demo coder deathy has set up a one-question survey that asks which video modes your set-up supports. Please take a moment to answer it. It’ll be a big help to MEGA65 game and demo developers!
[Update: Some readers have reported that SurveyMonkey is failing to show the survey correctly in some European countries. You might be able to copy-paste the URL after visiting it: https://www.surveymonkey.com/r/BBFR5WG ]
Xanadu

Syntax 2022, the 16th annual demo party in Melbourne, Australia, took place this month, and the MEGA65 was there! deathy and MEGA65 contributor Gurce, both members of the BAS demo group, produced “Xanadu,” a two-part tribute to the late Olivia Newton-John.
Part one is written in assembly language and features an arrangement of the Newton-John classic using all four SID chips. Part two offers another take, this time rendered entirely in BASIC with the PLAY command.
Download the D81 disk image and run it on your MEGA65 today!
There’s plenty more to say about music on the MEGA65, but it’ll have to wait for future issues. Until next time, thanks for listening!
— Dan