Taste the Rainbow
Taste the Rainbow. Dan’s MEGA65 Digest for June 2025.
Hey all! I’ve been a bit busier than usual lately, so this Digest is tardy. If we could all pretend that it’s still June for just a few moments I’d appreciate it.
A character graphics system limits the amount of memory needed to describe what appears on a raster display, and thus the amount of computation needed to update it. It does this through indirection: instead of describing every pixel on the screen, it describes a smaller set of repeatable patterns, or characters, along with a description of where those patterns appear in a grid.
Such systems typically apply a similar idea to color, finding benefits in describing characters and colors separately. For example, declaring the character to display and its color separately allows a program to reuse the image data in different colors. Flexible color systems such as the MEGA65’s VIC-IV also use indirection for defining the colors: color data references entries in a palette (“color #2”), and each entry describes the color value to use when the entry is referenced (“2 = red”).
Last month (remember we’re pretending it’s June), we began exploring character graphics using the built-in PETSCII character set and the default system palette. We covered how to describe the display in terms of these presets with data in screen and color memory. This month, we’ll look at defining custom colors and custom character images. We’ll take this opportunity to explore two color-related alternate display modes from the VIC-II era, and see how different graphics modes make tradeoffs to give us more options.
Let’s do some Features Files, then get right to it.
Featured Files
muse has three arcade cores for us this month:
Kiwi has given us a beta release of a text editor: Mega Edit. Some features are still in progress. Inspired by Compute!’s SpeedScript.
Fifth Wins by Hanyic Róbert, a two-player logic game. Play against the computer or another player.
Great work everyone, keep it up!
PETSCII characters and playing cards
Let’s make a card game! The PETSCII character set has symbols for the four playing card suits. You can type these directly onto the screen: hold Shift, then type A, S, Z, or X. Just as on a Commodore 64, the keys on your MEGA65 have their corresponding graphics symbols printed on the front. Hold Mega to type the left-hand symbol, Shift for the right-hand symbol.
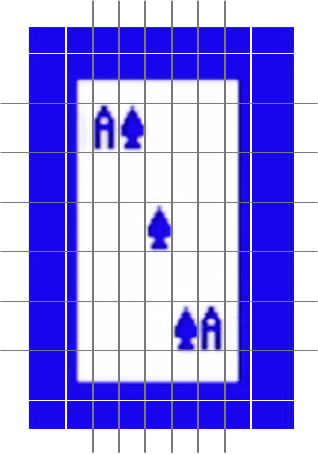
To draw the playing card image above, I typed the graphics symbols as follows:
- The four corners are Mega + D, F, C, and V. These are screen codes 108, 123, 124, and 126, respectively.
- The top edge is Mega + I, screen code 98. To draw the bottom edge, I switched to Reverse Mode by typing Ctrl + 9, then typed Mega + I to produce screen code 98 + 128 = 226. (Use Ctrl + 0 to exit Reverse Mode.) With the PETSCII character set, adding 128 to the screen code from 0 to 127 refers to its reverse (128 to 255).
- The right edge is Mega + K, screen code 118. To draw the left edge, I switched to Reverse Mode, then typed Mega + K to produce screen code 118 + 128 = 246.
- The inner characters are reversed versions of the letter A (code 1 + 128 = 129), the spade (Shift + A, code 65 + 128 = 193), and the space (code 32 + 128 = 160).
Try drawing your own playing card by typing into the screen editor.
Remember, a screen code refers to an entry in the active character set. When you type Shift + A, the screen editor writes screen code 65 to the location in screen memory that corresponds with the cursor position. See “Appendix D: Screen Codes” in the User’s Guide.

If we wrote our card game in assembly language, we might represent the card images as screen codes in our program data, and draw them by storing these codes directly into screen memory. A BASIC program could do the same with T@&(X,Y) = ... and C@&(X,Y) = ..., or use POKE with the screen memory address as shown in the last Digest.
Another way to draw the cards is to manipulate the screen editor’s cursor. This is what happens when a BASIC program uses the PRINT command, or when an assembly language program calls the CHROUT KERNAL routine. Instead of a screen code, the program emits a PETSCII code that tells the cursor what to do. Some codes print a character at the cursor’s position and in the cursor’s color. Other codes change the cursor’s color or position. We explored PETSCII codes in a previous Digest. The screen editor implements the cursor’s behavior by writing screen codes to screen memory and color codes to color memory.
Custom colors everywhere
So what’s the deal with these color codes? Each available color is assigned a number. The number written to color memory for a location on the screen determines the foreground color of that character. The background and screen border also each have a color code, stored in dedicated registers.
BASIC 65 has commands that can change the background and border colors. Try these with numbers in the range 0 to 31:
BACKGROUND 0
BORDER 2
For a list of the default colors of the system palette, see “Appendix E: System Palette” in the User’s Guide, or refer to this chart:
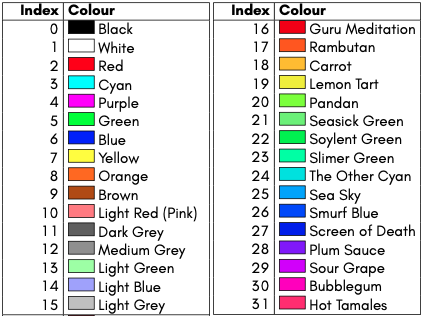
The C64 has a fixed palette of 16 colors, numbered 0 to 15. I’m used to thinking that 0 is always black, 1 is white, 6 is blue, etc., and might be comfortable calling these “color codes.”
On the MEGA65, you can change the color of any entry to any of 4,096 possible colors. Here, color codes are probably better known as “palette codes.” Similar to a painter’s palette, you can put any color you want into any palette entry.
I want the background color for this card game to be a dark green, like the felt of a traditional card table. The default system palette doesn’t have a dark green. But no worries, we can make our own:
PALETTE COLOR 22,0,7,0
BACKGROUND 22
The PALETTE COLOR command takes a palette code, and a value for how much red, green, and blue to mix into the color, each a number from 0 to 15. The MEGA65 is mixing light, not paint, so the more color you add, the brighter the result. 0,0,0 is black, 15,0,0 is bright red, 15,15,15 is white, and so on. Here, I chose 0,7,0 for the green felt. Feel free to adjust this to your taste.
To set a system palette color from machine code, write the value from 0 to 15 to each of the red, green, and blue palette registers. The reds are at addresses $D100 to $D1FF, the greens are $D200 to $D2FF, and the blues are $D300 to $D3FF. For example, to change palette entry #22 (hexadecimal $16) to felt green, as above:
    lda #0
    sta $d116
    lda #7
    sta $d216
    lda #0
    sta $d316
A palette actually contains 256 entries, not just the 32 entries accessible by characters in our current text mode. The PALETTE COLOR, BACKGROUND, and BORDER commands support all 256 entries, numbered 0 to 255:
PALETTE COLOR 32,1,3,5
BORDER 32
There are a few ways to give characters access to more of the palette. We’re about to see two limited but interesting ways. We’ll cover full-color character modes in a later issue.
Four palette banks
The VIC-IV has four palette banks, each with 256 entries. The character system and the sprite system can use any of the four banks, and you can set characters and sprites to use different banks at the same time. There are not yet BASIC 65 commands for using other palette banks, but this is planned for a future ROM update (see issue 220, 221).
Palette bank selection goes through two-bit registers at address $D070. Each bit pair can select palette 0 (%00), 1 (%01), 2 (%10), or 3 (%11).
- To change the palette bank used for text, set the two-bit register BTPALSEL D070.4-5.
- To change the palette bank used for sprites, set SPRPALSEL D070.2-3.
- To set or read the colors assigned to palette entries in a given bank, set MAPEDPAL D070.6-7, then use the red, green, and blue registers $D100-$D3FF, as we saw earlier. The color value registers always reflect the selected palette.
Here’s a quick demo. Enable sprite 0, set it to palette entry 7, and move it onto the screen:
SPRITE 0,1,7
MOVSPR 0,100,100
Next, change hardware sprites to use palette bank 1 instead of 0:
POKE $D070, PEEK($D070) AND %11110011 OR %00000100
The AND %11110011 clears bits 2 and 3, while preserving the other settings. The OR %00000100 sets SPRPALSEL to palette bank 1, also while preserving the other settings. Yes, you can use SETBIT $D070,2 : CLRBIT $D070,3, but using POKE in this way ensures that both bits are set simultaneously with no time for the VIC to get confused while it is drawing.
Finally, change palette entry 7 of palette bank 1 to aquamarine:
POKE $D070, PEEK($D070) AND %00111111 OR %01000000
POKE $D107, 0   : REM RED
POKE $D207, 10  : REM GREEN
POKE $D307, 15  : REM BLUE
Now switch the cursor to palette entry 7: press Ctrl + 8 (yes, 8). The cursor switches to yellow, and you can type yellow text. Characters are using palette bank 0 while sprites are using palette bank 1.
What would happen if you switch characters to palette bank 1? How would you do this with a single BASIC command?
Understanding character sets
So far, we’ve been exploring character graphics using the built-in PETSCII character set. We can customize the character set to use any collection of 256 8-by-8 images that we want. This is one of the most powerful ways to add graphics to a game, and many Commodore games use custom character sets for game objects, backgrounds, and alternate text fonts.
A character set contains 256 character images, and each character image is 8 bytes, for a total of 2,048 bytes (2 kilobytes). The images are ordered by screen code.
A copy of the PETSCII character set is built into the ROM, starting at address $2.D000. We can find the image data for the suit symbols in this area using the screen code. For example, the spade is screen code 65, so its image data starts at byte offset 65 x 8 = 520 = $0208 from $2.D000, or address $2.D208.
Here’s a program that makes it easy to inspect a character of the PETSCII character set. Try changing line 10 to inspect other screen codes.
10 C = 65 : REM SCREEN CODE
20 PRINT "SCREEN CODE ";C
30 FOR A = $2D000 + C * 8 TO $2D000 + C * 8 + 7
40 V = PEEK(A)
50 PRINT "  ";HEX$(V),STRBIN$(V)
60 NEXT A
The PETSCII character data in ROM consists of two character sets, one for uppercase and graphics, and another for lowercase and uppercase. When you press Mega + Shift to change the letter casing mode, it is just switching between these character sets. The lowercase variant starts at address $2.D800. Try modifying this program to display screen codes from the lowercase character set.
Pointing to custom character sets
On the Commodore 64, the VIC-II starts in a state that uses the PETSCII character set from the built-in ROM. A program can tell the VIC to use a custom character set instead by setting registers to an address in RAM where the charset is stored. As a kid, I wrote many programs that would copy the PETSCII charset from ROM to RAM, point the VIC to the RAM address, then make changes to certain characters.
The VIC-II integrates with the C64’s memory system in a somewhat complicated way, with restrictions on what memory the VIC can see and where in memory graphics data can be located. The MEGA65 emulates these methods for backwards compatibility. I won’t explain these methods here, because the MEGA65 offers other ways to use custom character sets that are easier to understand.
The VIC-IV provides a 24-bit pointer register, CHARPTR D068-D06A, that can locate the active character set at any address in the first 384 KB of memory. Here’s a simple demonstration that sets CHARPTR to the location in ROM where FONT B is stored ($3.D000):
WPOKE $D068,$D000:POKE $D06A,$03
Note that as of ROM 920416, Run/Stop + Restore does not restore CHARPTR to its default. This will be fixed in a later update; see issue 236.
Similar to changing SCRNPTR to quickly switch between sets of screen memory, a program can use CHARPTR for special graphical effects that require quickly switching between character sets.
For backwards compatibility with the VIC-II, CHARPTR treats addresses in the ranges $00.1000 - $00.1FFF and $00.9000 - $00.9FFF as special. When looking for character set data, the VIC-IV translates these addresses to a special area of memory, the VIC-IV character set buffer, at $FF7.E000 - $FF7.EFFF. The MEGA65 sets up this buffer with the PETSCII character set that the VIC-II would expect in ROM at these addresses.
The VIC-IV character set buffer
It turns out, the VIC-IV character set buffer is more useful to MEGA65 programs than was originally intended.
When the MEGA65 starts, it copies the PETSCII font from ROM to the VIC-IV character set buffer at the address range $FF7.E000 - $FF7.EFFF. Similar to a C64, the computer starts with CHARPTR set to $00.1000, so it uses $FF7.E000 for the active character set, uppercase PETSCII.
Early MEGA65 developers noticed that programs can write directly to the character set buffer. In many cases, you don’t have to hassle with copying ROM to RAM or re-pointing CHARPTR just to get a custom character set. You can just poke directly into the buffer to change what it thinks “character ROM” is. This is totally cheating! Kids today don’t know the pain of throwing 2 KB of RAM onto the fire just to customize the font.
BASIC 65 takes full advantage of this capability. The CHARDEF command locates the character’s image data in the buffer via the screen code ($FF7E000 + C * 8), then writes the new image data to that location. Similarly, the FONT C command resets everything back to the PETSCII font by copying the character set from $2.D000 to $FF7.E000.
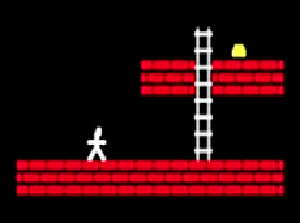
10 REM PLAYER GUY
20 CHARDEF 65,$0C,$1C,$18,$FF,$18,$3C,$66,$C3
30 REM BRICK WALL
40 CHARDEF 66,$FB,$FB,$00,$DF,$DF,$00,$FB,$FB
50 REM LADDER
60 CHARDEF 67,$42,$7E,$42,$42,$42,$7E,$42,$42
70 REM GOLD BAR
80 CHARDEF 68,$00,$00,$00,$00,$3C,$7E,$7E,$00
Here’s an equivalent program that writes values directly to the character set buffer. This illustrates values in DATA statements, but this could easily come from a file. (This resembles how you’d do this in assembly language.)
10 FOR I=0 TO 31
20 READ V
30 POKE $FF7E000 + 65 * 8 + I, V
40 NEXT I
50 DATA $0C,$1C,$18,$FF,$18,$3C,$66,$C3 : REM PLAYER GUY
60 DATA $FB,$FB,$00,$DF,$DF,$00,$FB,$FB : REM BRICK WALL
70 DATA $42,$7E,$42,$42,$42,$7E,$42,$42 : REM LADDER
80 DATA $00,$00,$00,$00,$3C,$7E,$7E,$00 : REM GOLD BAR
It’s common for games to completely replace the character set with a custom font, as well as with tiles for in-game graphics. On the MEGA65, this is as simple as loading that data into the character set buffer. For a quick experiment, we can find C64 character sets on the Internet that have been extracted from vintage games and various versions of Commodore ROMs.
Try this:
- Visit the C64 charset gallery by Peter Kofler, and browse for a character set you’d like to try. Click on it to download it. Typically it’s a
.zipfile, so expand it to get to the contents. The data file is either a.64cfile or.binfile. - Use a tool such as M65Connect (see Filehost), DirMaster (Windows only), or droid64 to create a D81 disk image, and copy the charset file to the disk. Transfer the disk image to your MEGA65’s SD card.
- On your MEGA65, mount the disk image.
- Use the
BLOADcommand to load the file into the VIC-IV character set buffer.
If the file is a .64c file, invoke BLOAD like so, to skip the two-byte address header and load the data into the buffer:
BLOAD "FONTNAME.64C",P($FF7E000)
If the file is a .bin file, provide the ,R argument to tell BLOAD that the file does not have an address header:
BLOAD "FONTNAME.BIN",P($FF7E000),R
See also Commodore character ROMs at zimmers.net, and C64 fonts by patrickmollohan. These archives distribute .bin files, so use BLOAD ..., R with these.
When you’re done enjoying the custom charset, press Run/Stop + Restore to return to PETSCII. (Run/Stop + Restore does know how to reset the character set buffer.)
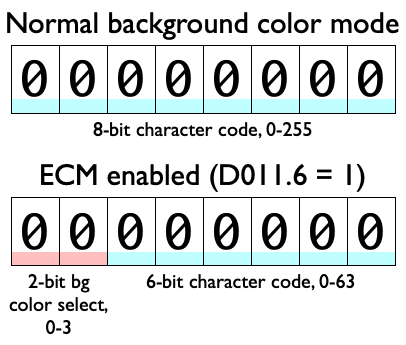
Extended background color mode
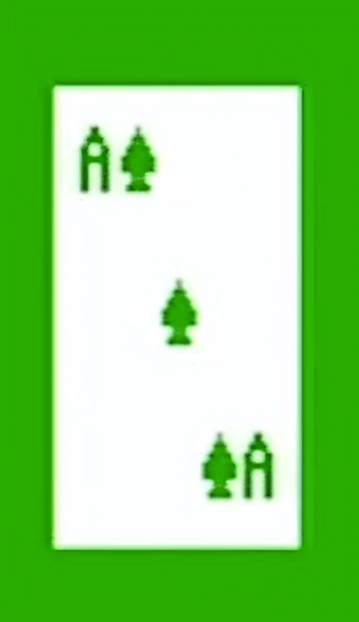
This playing card looks roughly like the Ace of Spades, but something is off. The characters on the card are drawn with reverse characters, using white for the foreground color and letting the green background through for the card’s value and suit. Ideally, we’d draw the value and suit of the card in black (spades and clubs) or red (hearts and diamonds) onto the white card surface. Can we do this, and still keep our green background?
For that, we need to introduce a new graphics mode. Extended Background Color Mode (ECM) allows us to choose three additional background colors (for a total of four), and select from one of the four background colors for each character individually. ECM works the same way as it does on the Commodore 64’s VIC-II chip. With the MEGA65, it also works in the higher resolution text modes and with custom palettes.
ECM comes at a price. The Commodore 64 did not have additional memory for storing background color selections for each character, so instead, ECM steals the upper two bits of the screen code for this purpose. This leaves fewer bits for selecting a character from the character set, limiting the selection to the first 64 screen codes.
To enable ECM, set $D011 bit 6. The registers for the four background colors are $D021 (the normal background color register), $D022, $D023, and $D024. These registers can be set to any of the 256 entries of the selected character graphics palette.
The following program draws all 256 screen codes onto the screen, waits for a key press, then enables ECM. The selected background colors are blue (6), black (0), red (2), and purple (4).
10 BACKGROUND 6
20 SCNCLR:CURSOR 0,4
30 FOR R=0 TO 3:FOR C=0 TO 63
40 T@&(C,R)=R*64+C
50 NEXT C:NEXT R
60 GETKEY A$
70 POKE $D022,0
80 POKE $D023,2
90 POKE $D024,4
100 SETBIT $D011,6 : REM ENABLE ECM
110 GETKEY A$
120 CLRBIT $D011,6 : REM DISABLE ECM

Remember how the screen editor’s blinking cursor toggles bit 7 on the screen code, which normally goes back and forth between normal and reversed characters? With ECM enabled, this actually flips between two background colors. This is a neat effect—unless the two background colors are the same, in which case the cursor becomes invisible.
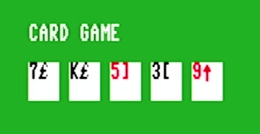
Extended Background Color Mode seems like it would be useful for our card game. The regular background color is our custom felt green color, there’s an alternate background color we can set to white for the card background, and the text on the card can be any of the first 32 palette entries, such as black-on-white or red-on-white.
Maybe you’ve already noticed: there’s a problem with this plan. ECM denies us access to the characters we were using to draw spades, clubs, hearts, and diamonds, not to mention the snazzy border characters. We only get 64 possible characters in this mode, and they’re showing up as letters, numbers, punctuation, and that’s about it. What else is there to do?
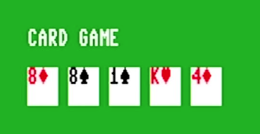
Custom character sets to the rescue! We just need to replace four of the available 64 characters with the images for the suit symbols, and use those characters to draw cards.

We could figure out the bytes for each symbol and write them into our program as above. In this case, the characters we want are already in the character set, so we could just copy them down. The screen codes for the spade, club, heart, and diamond are 65, 88, 83, and 90, respectively. Let’s copy these to slots 27, 28, 29, and 30.
10 FOR I=0 TO 3
20 READ A,B
30 FOR J=0 TO 7
40 POKE $FF7E000 + B * 8 + J, PEEK($2D000 + A * 8 + J)
50 NEXT J
60 NEXT I
70 DATA 65,27,88,28,83,29,90,30
Here’s the updated character set with ECM enabled, with the copied symbols.

With the appropriate background color settings, we can now draw values and suits in their correct colors, over a white card background, on a green felt tabletop.
To get those nice border characters, I could sacrifice eight more punctuation symbols. Every project has to decide what it needs and what it’s willing to give up.
Low-res Multicolor Character Mode
The VIC-II has another way to get more color into its characters. In Low-res Multicolor Mode (MCM), a character can use any of four possible colors for each pixel. As always, you can’t get something from nothing, and this comes with tradeoffs: each pixel is doubled in width, and a character is four such pixels across.
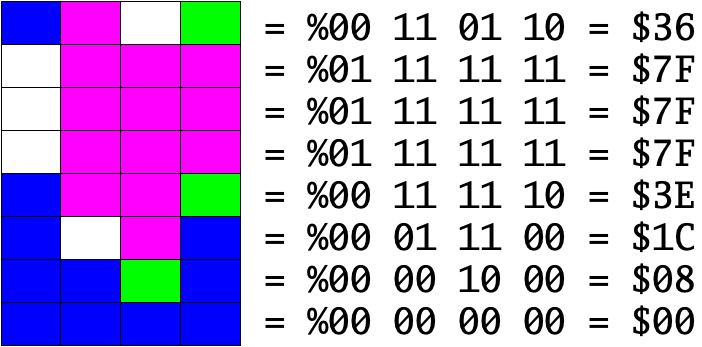
The character set data is still one byte per row, with each pair of bits selecting the color for that double-wide picture element. These bit-pairs select the following color options:
- %00 = background
- %01 = register $D022
- %10 = register $D023
- %11 = character foreground
As with ECM, the background and colors $D022 and $D023 apply to the entire screen. Bit-pair %11 selects the foreground color, which can be different for each character, as usual.
You can mix high resolution and low resolution characters on the same screen. This is great if you want to display PETSCII text alongside low-res high color images. But yes, this comes with another tradeoff. With MCM enabled, color bit 3 determines whether the character is hires (0) or lowres (1). You can only use the first 8 palette entries for the foreground color.
MCM also ignores color bits 4 through 7. Character attributes are disabled with MCM enabled.
Sound like fun? Let’s try it.
10 SCNCLR
20 REM REDEFINE THE @ SYMBOL TO ILLUSTRATE ALL FOUR BIT PAIRS
30 CHARDEF 0,$00,$00,$55,$55,$AA,$AA,$FF,$FF
40 REM ENABLE MCM
50 SETBIT $D016,4
60 REM SET SCREEN COLORS
70 POKE $D022,3
80 POKE $D023,4
90 BACKGROUND 6
100 FOR C=0 TO 15
110 T@&(C,0)=0
120 C@&(C,0)=C
130 NEXT C
140 GETKEY A$
150 CLRBIT $D016,4
This program defines a character pattern using all four bit pairs, then displays eight of these characters in hires mode in the first eight colors, followed by the same eight characters in lowres mode. Press a key to disable MCM to see all sixteen characters in hires mode. Try experimenting with different character patterns, color combinations, and color attribute values.
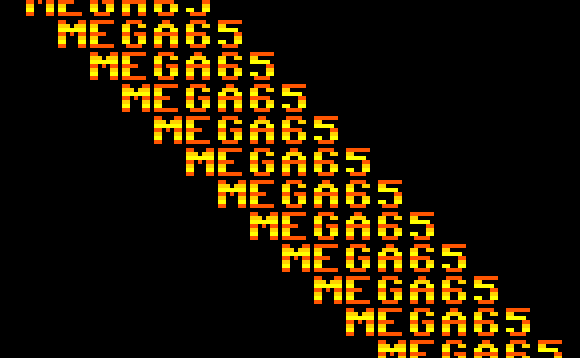
If these tradeoffs make Low-res Multicolor Character Mode seem a bit disappointing, consider this: The MEGA65 has customizable palettes, so you have quite a few more color options than on a C64. Also, the MEGA65 has double the horizontal resolution of a C64. If you’re willing to give up some space in the character set, you can display a full 40 columns of four-color characters.
10 SCNCLR
20 SETBIT $D016,4
30 POKE $D022,17
40 POKE $D023,18
50 BACKGROUND 0
110 CHARDEF  1,$14,$2A,$3F,$14,$28,$3C,$14,$00
120 CHARDEF  2,$05,$2A,$FF,$45,$0A,$0F,$05,$00
130 CHARDEF  3,$15,$28,$3C,$15,$28,$3C,$15,$00
140 CHARDEF  4,$54,$00,$00,$40,$00,$00,$54,$00
150 CHARDEF  5,$05,$28,$3C,$14,$28,$3C,$05,$00
160 CHARDEF  6,$50,$28,$00,$54,$28,$3C,$50,$00
170 CHARDEF  7,$01,$0A,$3C,$15,$28,$3C,$14,$00
180 CHARDEF  8,$40,$A0,$3C,$54,$28,$3C,$14,$00
190 CHARDEF  9,$05,$28,$3C,$15,$28,$3C,$05,$00
200 CHARDEF 10,$50,$28,$00,$50,$28,$3C,$50,$00
210 CHARDEF 11,$15,$28,$3F,$00,$00,$3C,$05,$00
220 CHARDEF 12,$54,$00,$F0,$14,$28,$3C,$50,$00
300 FOR R=0 TO 24:FOR X=1 TO 12
310 T@&(X+2*R,R)=X
320 C@&(X+2*R,R)=15
330 NEXT X:NEXT R
340 GETKEY A$
350 CLRBIT $D016,4
360 FONT C
Extended background color mode and low-res multicolor character mode are two ways the VIC-II, VIC-III, and VIC-IV give you more options for displaying character graphics. They work by changing the way screen code bits are interpreted, trading off one capability for another, using the same amount of screen memory as normal (hires, low color) text mode. This was critical with the C64, which didn’t have more memory to spare.
The MEGA65 comes bundled with 384 kilobytes of memory usable for graphics. What could the VIC-IV chip do for us if we give it more memory? We’ll find out next month. Er, this month. You know what I mean.
This Digest is made possible by a group of amazing people making monthly donations. If you’d like to join this group, visit ko-fi.com/dddaaannn.
Happy hacking!
— Dan